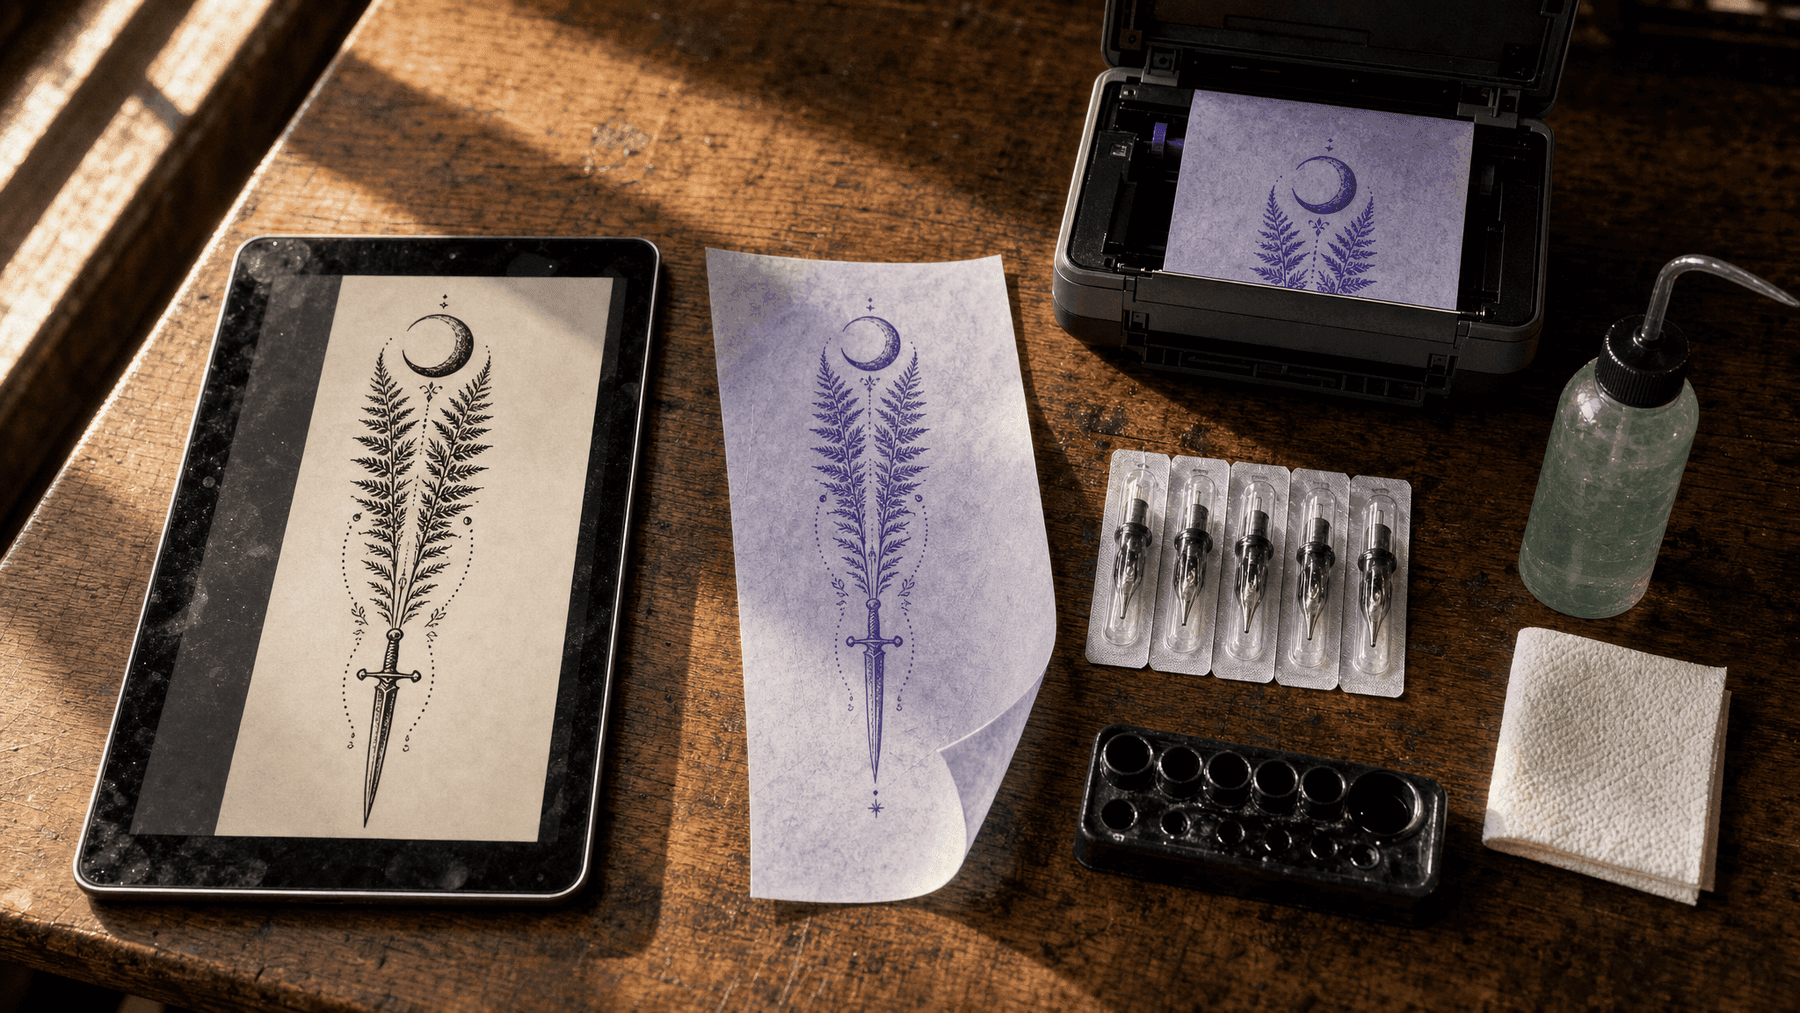
A tattoo studio bench: a vertical ornamental spine design on a tablet, a freshly printed purple thermal stencil beside it, transfer unit and sterilised tools, hard window light across the wood
The design has to survive this bench before it survives skin.
Picture the moment from behind the counter. Someone slides their phone across, screen up, grinning. On it is a design so fine and so glowy it looks like it was breathed onto the screen. The artist looks at it for three full seconds without saying anything.
Then comes the part nobody enjoys. Those hairline gradients will be a grey smudge in four years. That mirrored half is not actually mirrored. At the size you want, on the part of the body you want, half of those lines will merge into one thick line the week they heal.
The model is not the problem. Your prompt is. Almost every "50 best AI tattoo prompts" list on the internet teaches you to write the word tattoo, and that single word is what wrecks the output. An image model hears "tattoo" and paints you a photograph of inked skin. A tattoo artist needs the opposite thing: a flash sheet. Flat paper, closed black lines, real white space, a stated size in centimetres.
Swap that one word and everything downstream changes. Then fill in the seven other slots most prompts leave empty, and you get something a studio can actually print, transfer and needle.
Key takeaways
- Write flash sheet on off-white paper, not "tattoo". The word "tattoo" makes models render skin; the word "flash" makes them render a design you can trace.
- A prompt an artist can work from has 8 slots: subject, style, line weight, shading and fill, composition and symmetry, negative space, placement and scale in cm, and hard constraints.
- Kill every "8k, hyper detailed, beautiful shading" habit. Those words are exactly what produces micro-gradients that blur out on healed skin.
- The full chain (scout the composition, render the flash, convert to a stencil, preview it on your own back, then stress-test it with a 5 second motion clip) runs in one browser tab, and the first design can come out of a free generator.
- Bring the result in as a reference, not an order. Nothing about an AI prompt makes you the client who dictates size and placement.
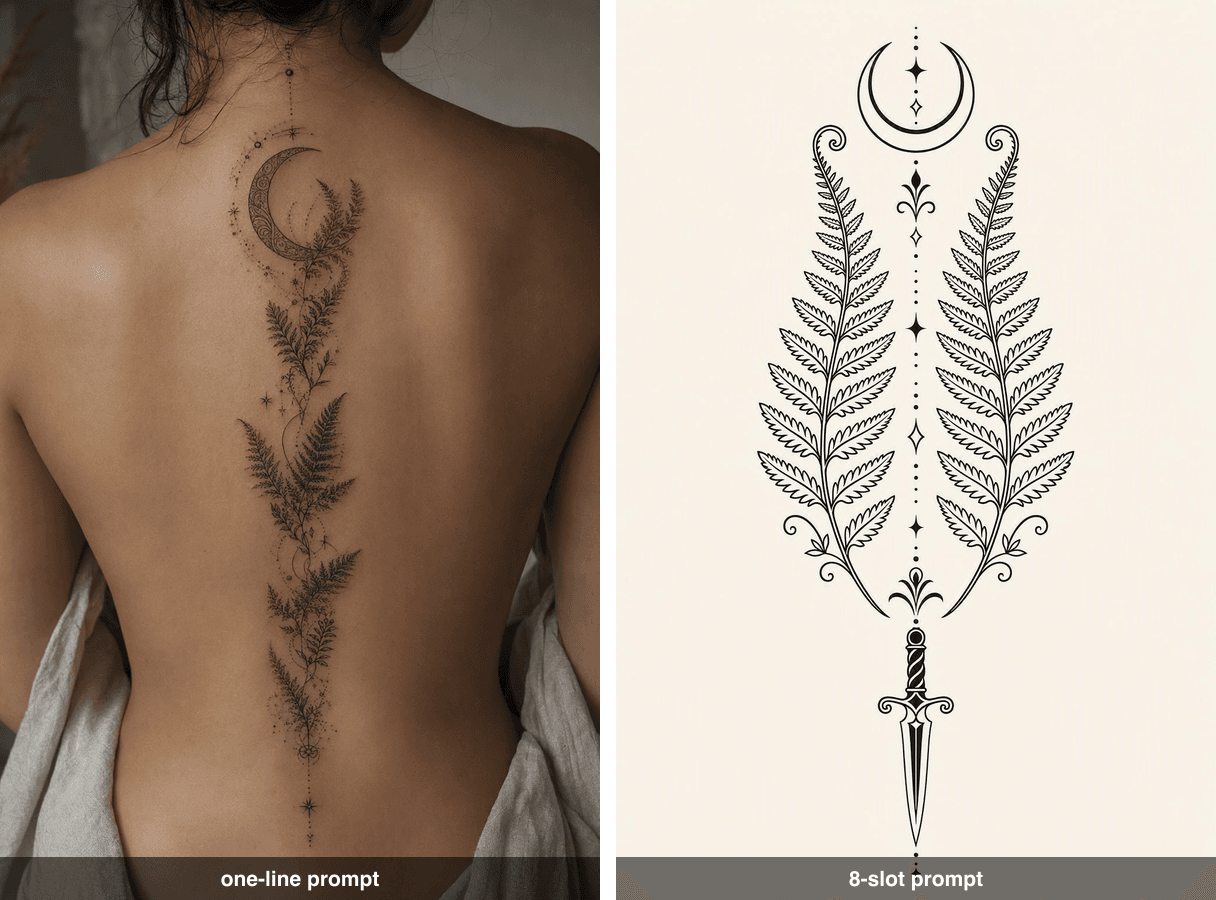
Side by side: left, the output of a one-line prompt, a photograph of a tattooed back with soft grey gradients, hair-thin detail and no symmetry; right, the output of the 8-slot prompt, a clean vertical flash sheet with pure black lines, even dotwork and strict mirror symmetry
Same idea, same model, same day. Left: "a beautiful crescent moon and fern tattoo, spine tattoo, detailed, elegant, 8k". Right: the 8-slot prompt from this article. Only one of these gets transferred onto a back.
Why Most AI Tattoo Prompts Produce Art, Not Tattoos
Tattooing has never been more mainstream. Pew Research Center found 32% of U.S. adults have at least one tattoo, 22% have more than one, and 24% of tattooed adults regret at least one of theirs (Pew Research Center, August 2023). That regret number is the whole argument for planning with images first. A bad generation costs you nothing. A bad tattoo costs you a laser technician.
So people generate. And then they walk into a studio with something unbuildable. Working artists keep describing the same three failures.
Failure one: you asked for a tattoo, so you got skin. Say "spine tattoo" and a text-to-image model will happily hand you a photograph of a back with ink on it. That is a picture of a finished result, not a design. There is no clean linework to print, no white background, no way to make a stencil out of it. The fix is a vocabulary swap, not a better model.
Failure two: detail that cannot heal. Soft gradients, semi-transparent overlays, hair-thin filigree stacked three deep. On a screen it reads as craftsmanship. Under skin, ink spreads. Lines that sit closer than a couple of millimetres tend to bleed into each other over years, and a delicate wash becomes a grey patch. Every "hyper detailed, 8k, intricate" token in your prompt is pushing the model toward exactly this.
Failure three: it ignores the body. This is the one artists get loudest about. Chris Dobransky of Alchemist Tattoo told a local news crew that AI designs do not adapt to an individual's anatomy, and walked through how real placement has to work "with the flow of this arm", accounting for muscle structure and joints that a generator simply does not know are there (KFYR-TV, April 2026). A generator has no idea your design is going on a spine that curves, or on a finger with a surface area the size of a stamp.
None of that is fixed by regenerating. It is fixed by writing the information an artist would have asked you for anyway.
The AI Tattoo Prompt Formula, and the Stack That Runs It
Here is the anatomy. Eight slots. Every slot you skip is a decision the model makes for you, and it will make it like an illustrator, not a tattooer.
The running example for the whole article is one design: an ornamental spine piece. Crescent moon at the top, two mirrored fern fronds cascading down a central axis, paired dotwork accents between them, a slim dagger at the base. Roughly 28 cm tall, spine and upper back. Symmetry is deliberately part of it, because symmetry is where image models fail most visibly.
Table A. The 8 slots, and what this demo actually wrote in each
| Slot | What it decides | The exact line used in this article's prompt |
|---|---|---|
| 1. Format and subject | Whether you get a design or a photo of skin | Tattoo flash sheet on off-white paper, vertical composition. Subject: an ornamental spine piece, crescent moon at the top, two mirrored fern fronds, dotwork accents, a slim dagger at the base |
| 2. Style | The visual family your artist will recognise by name | Style: fine-line ornamental blackwork |
| 3. Line weight | Whether it survives healing | Single-weight black outlines, bold outer contour, thin interior detail |
| 4. Shading and fill | Kills gradients before they appear | Solid black fills only, no gradients, no stippled photo texture |
| 5. Composition and symmetry | The thing models break silently | Strict left-right symmetry along one vertical axis, elements evenly spaced |
| 6. Negative space | Stops the model filling every gap | At least 8 mm of clean open paper between every element |
| 7. Placement and scale in cm | Ties detail density to real size | Designed to read at 28 cm tall along the spine |
| 8. Hard constraints | Removes skin, colour, text, watermarks | Flat black ink on paper, no skin, no body, no photograph, no colour, no background scene, no text, no watermark |
Slot 7 does more work than it looks. "28 cm tall along the spine" is not decoration; it is the sentence that makes the model stop cramming. And slot 6 is the one nobody writes. Models hate empty paper. If you do not name the gap in millimetres, it will fill it.
Now the stack. Four things have to happen to one design: scout the composition cheaply, render it properly, flatten it into a stencil, then see it on your own body. That is four different jobs, and no single model is the best at all four. The convenient part is that all of them sit on the same platform, so you are working in one tab and one balance instead of four subscriptions.
Table B. The models this run used, and what each one costs
| Step | Model | Input | Settings | Price (verified 17 Aug 2026) |
|---|---|---|---|---|
| Scout the composition | GPT Image 2 text-to-image | text | quality high, 1024x1536 | listed at $0.009, but the Run button quoted $0.16964 at these settings |
| Render the flash | Nano Banana 2 text-to-image | text | 2K, 2:3, PNG | 1K $0.08 / 2K $0.12 / 4K $0.16 |
| Convert to stencil | Nano Banana 2 edit | the flash | 2K, ratio locked to input | same three tiers, $0.12 quoted at 2K |
| Preview on skin | same edit endpoint, second call | your back photo + the flash | 2K, ratio follows the photo | same |
| Motion test | Kling v3.0 Turbo image-to-video | the on-skin preview | 5s, 720p | $0.56 for the clip, 15% off to $0.476 as of August 2026 |
One pricing habit is worth more than it looks, because the gap costs people money quietly. GPT Image 2's listed per-image price is the floor, not the ceiling: pick high quality at 1024x1536 and the Run button re-quotes at $0.16964, roughly nineteen times the headline figure. Nothing is hidden, it is right there on the button, but nobody reads the button. Do read it. Every price in this article is the number the Run button actually showed on the day, not the number on the pricing page, and on the video step it was the Run button that revealed a discount the model page did not advertise.
If you just want a first design in your hand before spending anything, the free AI tattoo generator takes a written description and returns one design free, no credit card, high resolution, no watermark stamped across it, and the page states results are cleared for commercial use. It is genuinely one free design, not unlimited free designs, so spend it on your best prompt rather than your first draft. Paste the 8-slot prompt below into it and you have the flash step covered before you decide whether the rest of the chain is worth the change in your pocket.
From AI Tattoo Prompt to Skin: The Whole Run, Step by Step
One design, five steps, every prompt copyable verbatim.
Step 1. Scout the composition with the cheap model, and settle the argument.
Before paying for a proper render, throw the idea at a cheap model four to six times and look at layouts. This is also where the article's A/B lives, so run both prompts back to back and keep both outputs.
Open the GPT Image 2 playground. Settings: quality high, size 1024x1536 (2:3 vertical, because a spine piece is vertical).
First, the prompt the listicles teach you. Run it exactly as written, typos of thinking included:
text1a beautiful crescent moon and fern tattoo, spine tattoo, detailed, elegant, 8k 2
Now the same idea with all eight slots filled:
text1Tattoo flash sheet on off-white paper, vertical composition. Subject: an ornamental spine piece, a crescent moon at the top, two mirrored fern fronds cascading down a central vertical axis, small dotwork accents between the fronds, a slim dagger pointing downward at the base. Style: fine-line ornamental blackwork. Line: single-weight black outlines, bold outer contour, thin interior detail. Shading: solid black fills only, no gradients, no stippled photo texture. Composition: strict left-right symmetry along one vertical axis, elements evenly spaced. Negative space: at least 8 mm of clean open paper between every element. Scale: designed to read at 28 cm tall along the spine. Constraints: flat black ink on paper, no skin, no body, no photograph, no colour, no background scene, no text, no watermark. 2
Run the second one three or four more times and you have a spread of arrangements to choose from. Pick the one where the symmetry holds and the dotwork spacing looks even, then move on. Do not try to perfect it here; this model is for deciding layout, not for the final artwork.
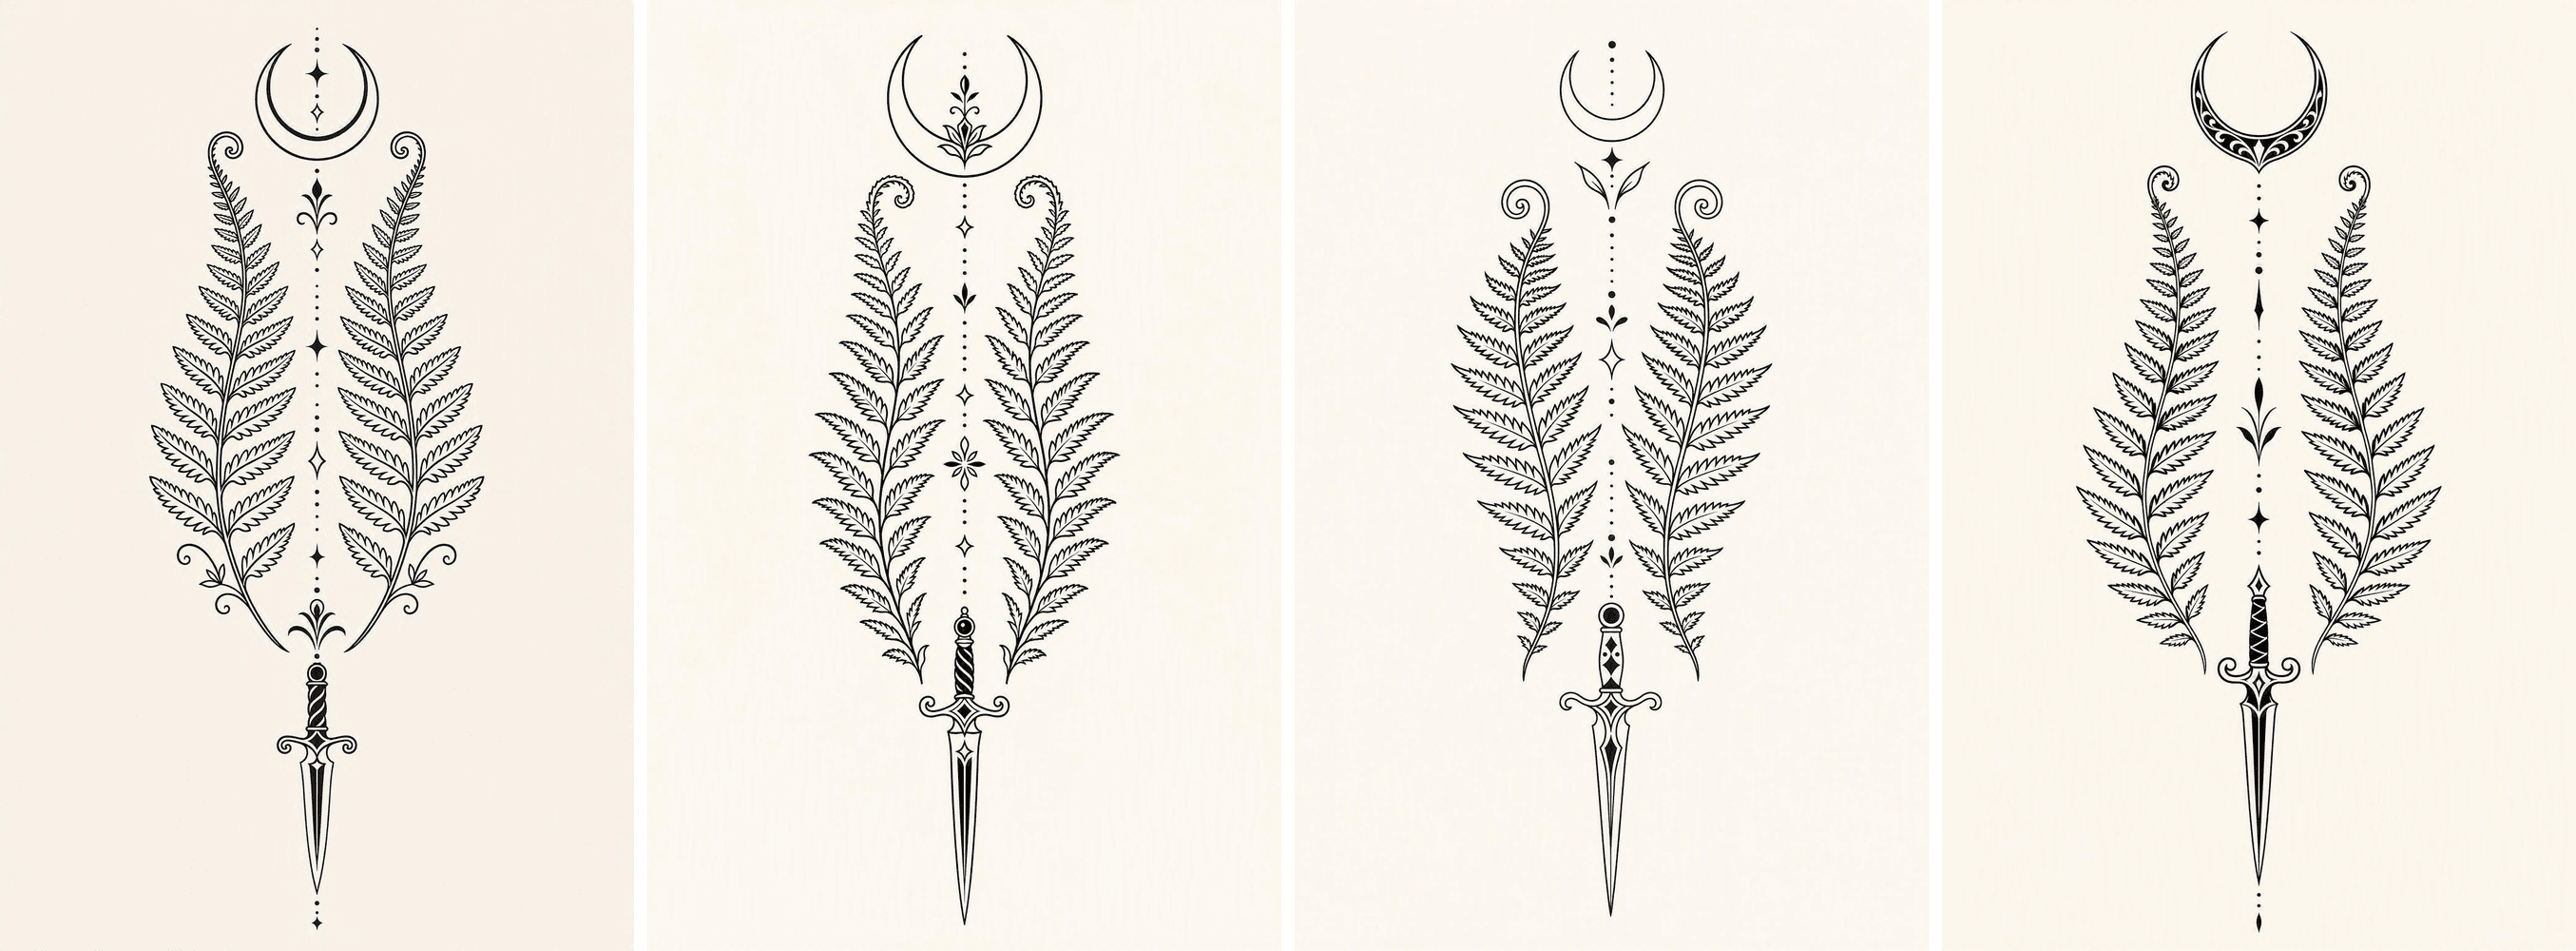
Four-panel scouting sheet: the same crescent moon, mirrored ferns, dotwork and dagger arranged four different ways as vertical flash sheets
Four cheap scouting runs off the same 8-slot prompt. Panel choice is about symmetry and spacing, nothing else.
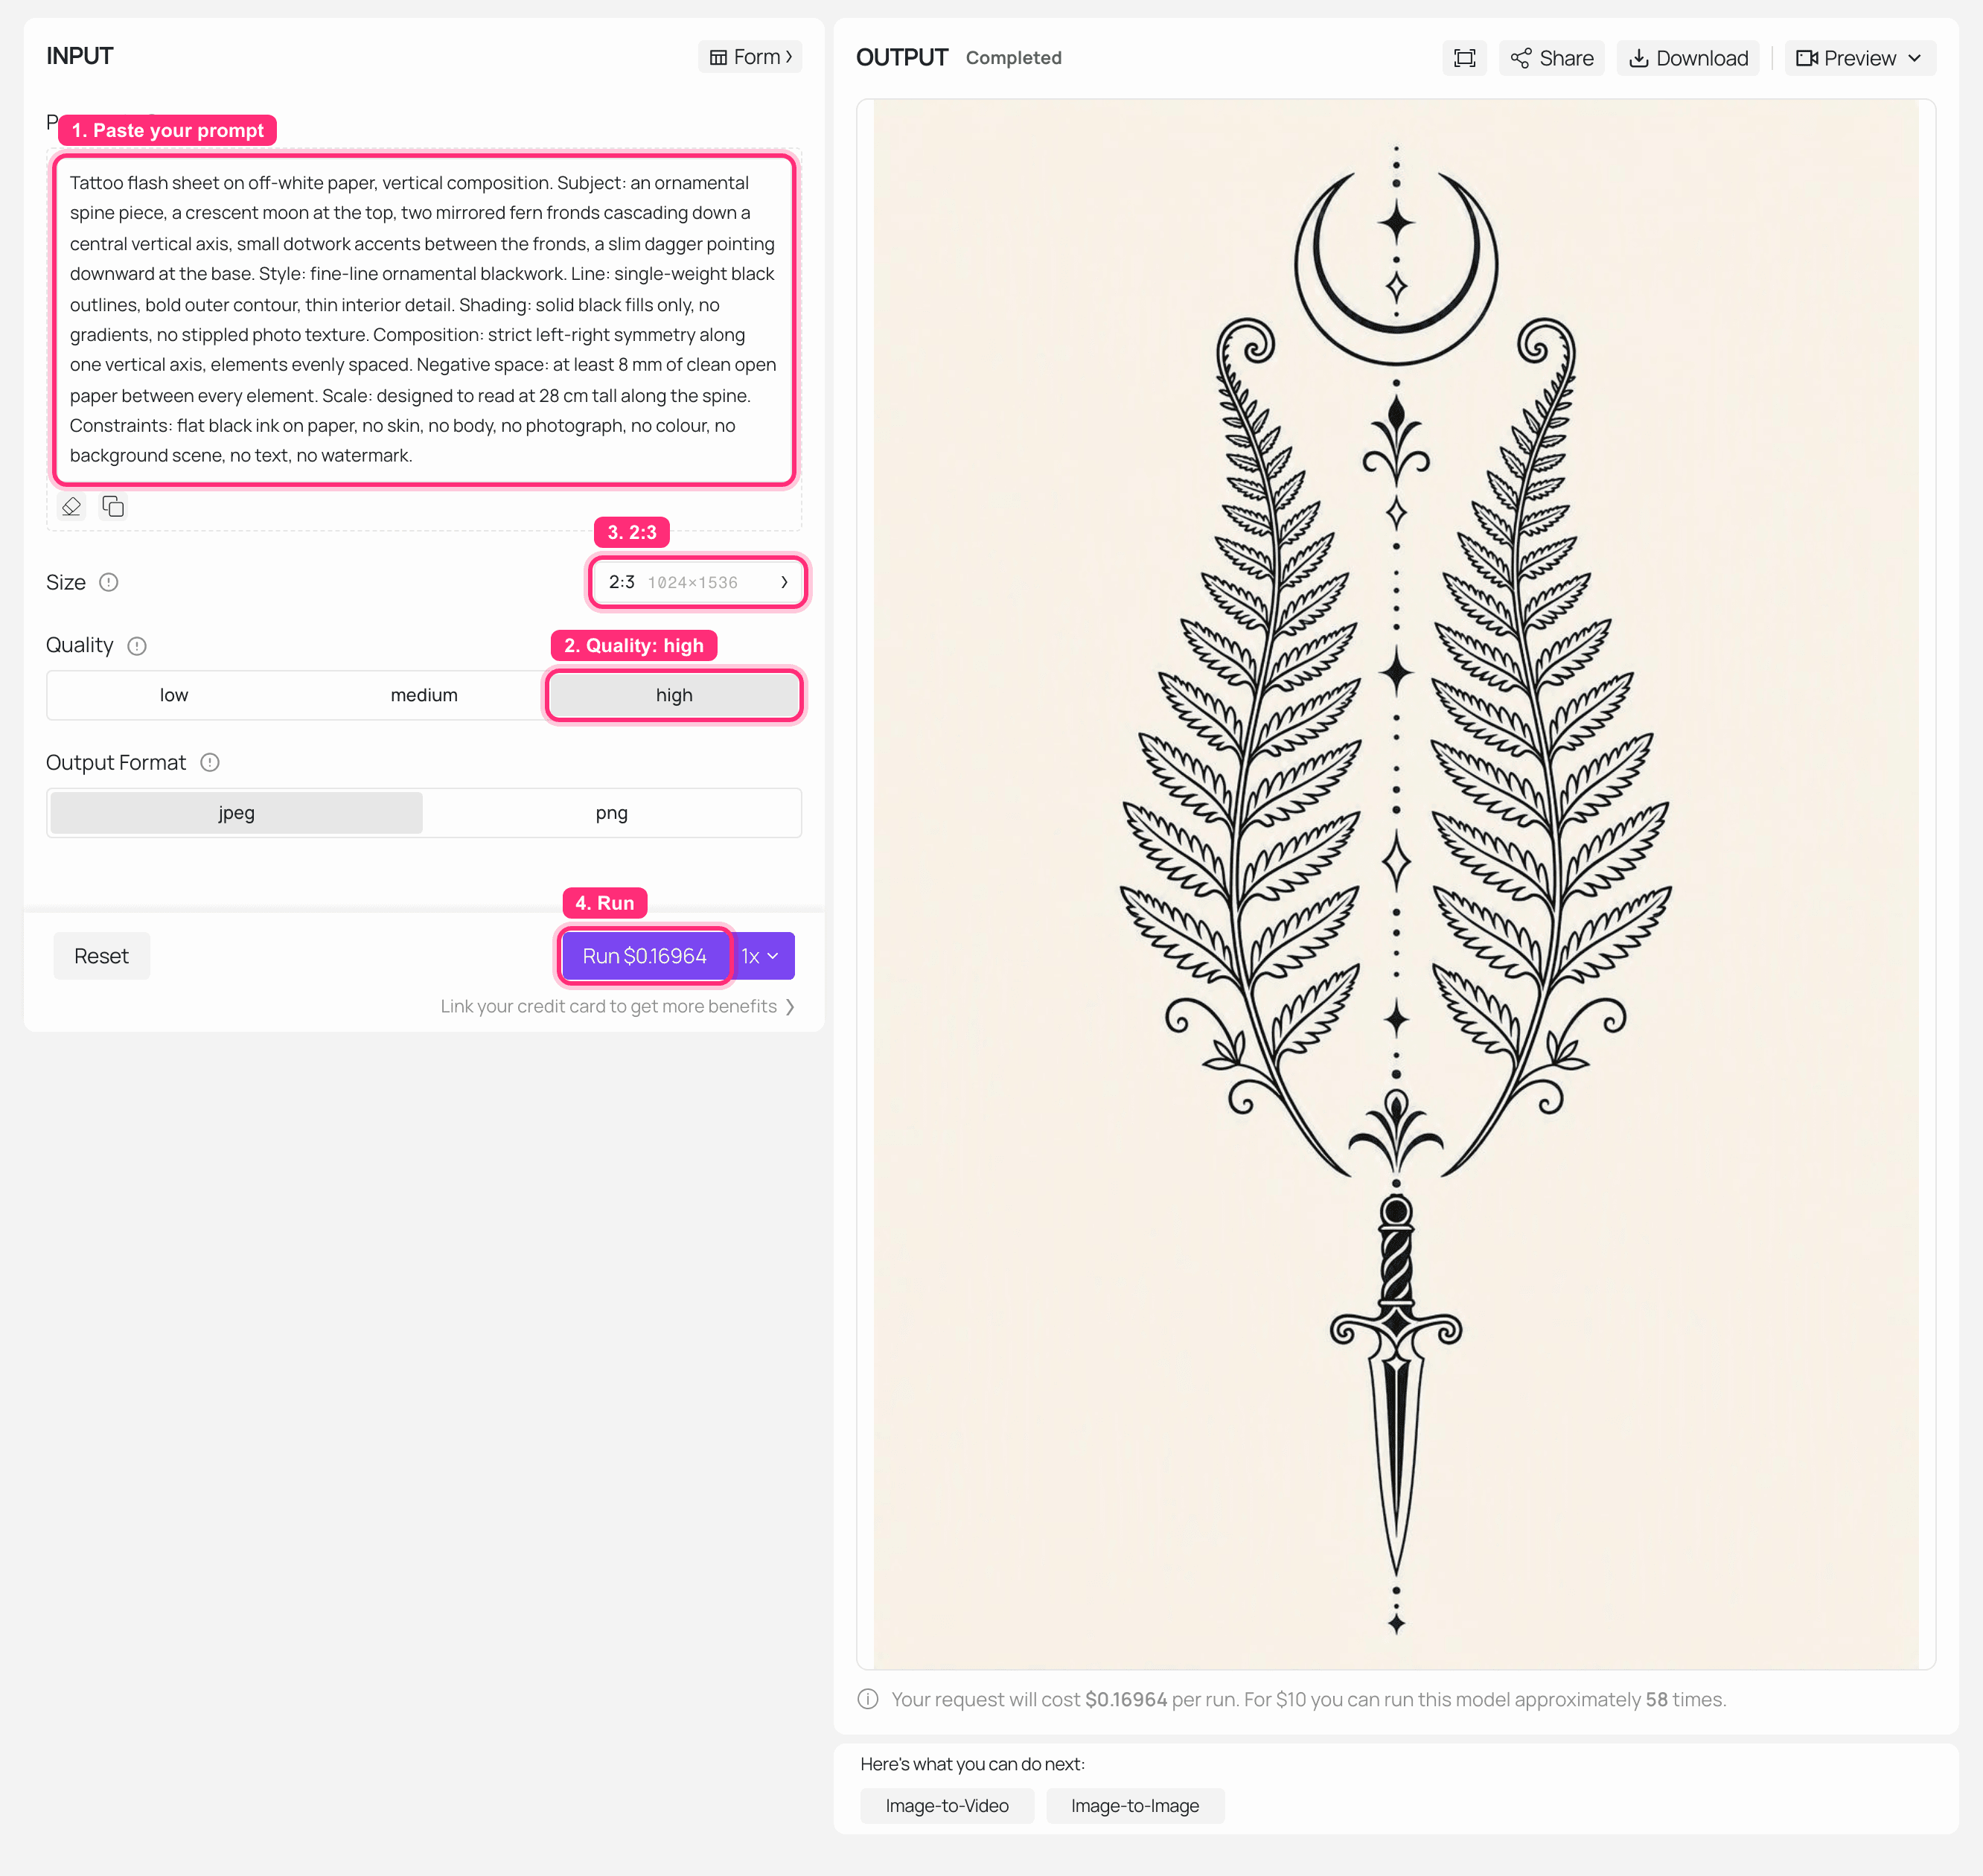
GPT Image 2 playground on Atlas Cloud with the 8-slot prompt in the input, quality set to high and a 2:3 vertical size, and the finished flash sheet rendered in the output panel
GPT Image 2 on Atlas Cloud: the 8-slot prompt in, quality high, 2:3, the scouting sheet on the right.
Step 2. Render the winning layout as a real flash sheet.
Now the detail matters, so switch to a stronger renderer and describe the layout you actually chose, element by element, including the counts. "Seven paired dotwork accents" gets you seven; "some dotwork" gets you a random number that breaks the symmetry.
Open the Nano Banana 2 text-to-image playground. Settings: resolution 2K, aspect ratio 2:3, output PNG. 2K is the sweet spot here. 4K costs more and adds nothing you can needle.
text1Tattoo flash on off-white paper, vertical 2:3 sheet, centred. An ornamental fine-line blackwork spine piece: a waning crescent moon at the top with a thin dotwork halo, two perfectly mirrored fern fronds descending down a single vertical axis for the length of the sheet, seven paired dotwork accents tapering from large to small, and a slim double-edged dagger at the base with a plain wrapped handle. Single-weight black linework with a heavier outer contour, solid black fills inside the moon only, no grey wash, no gradients, no cross-hatching. Strict bilateral symmetry: the left half is an exact mirror of the right half. Keep at least 8 mm of clean white paper between every element so the design still reads at 28 cm tall. Pure black ink on flat paper. No skin, no arm, no back, no photograph, no colour, no shadow, no text, no watermark, no signature. 2
Check the output for one thing before you continue: fold the image in half in your head. If the left fern and the right fern are not the same fern, run it again. Symmetry is the single most common silent failure, and it is much cheaper to fix here than after you have made a stencil out of it.
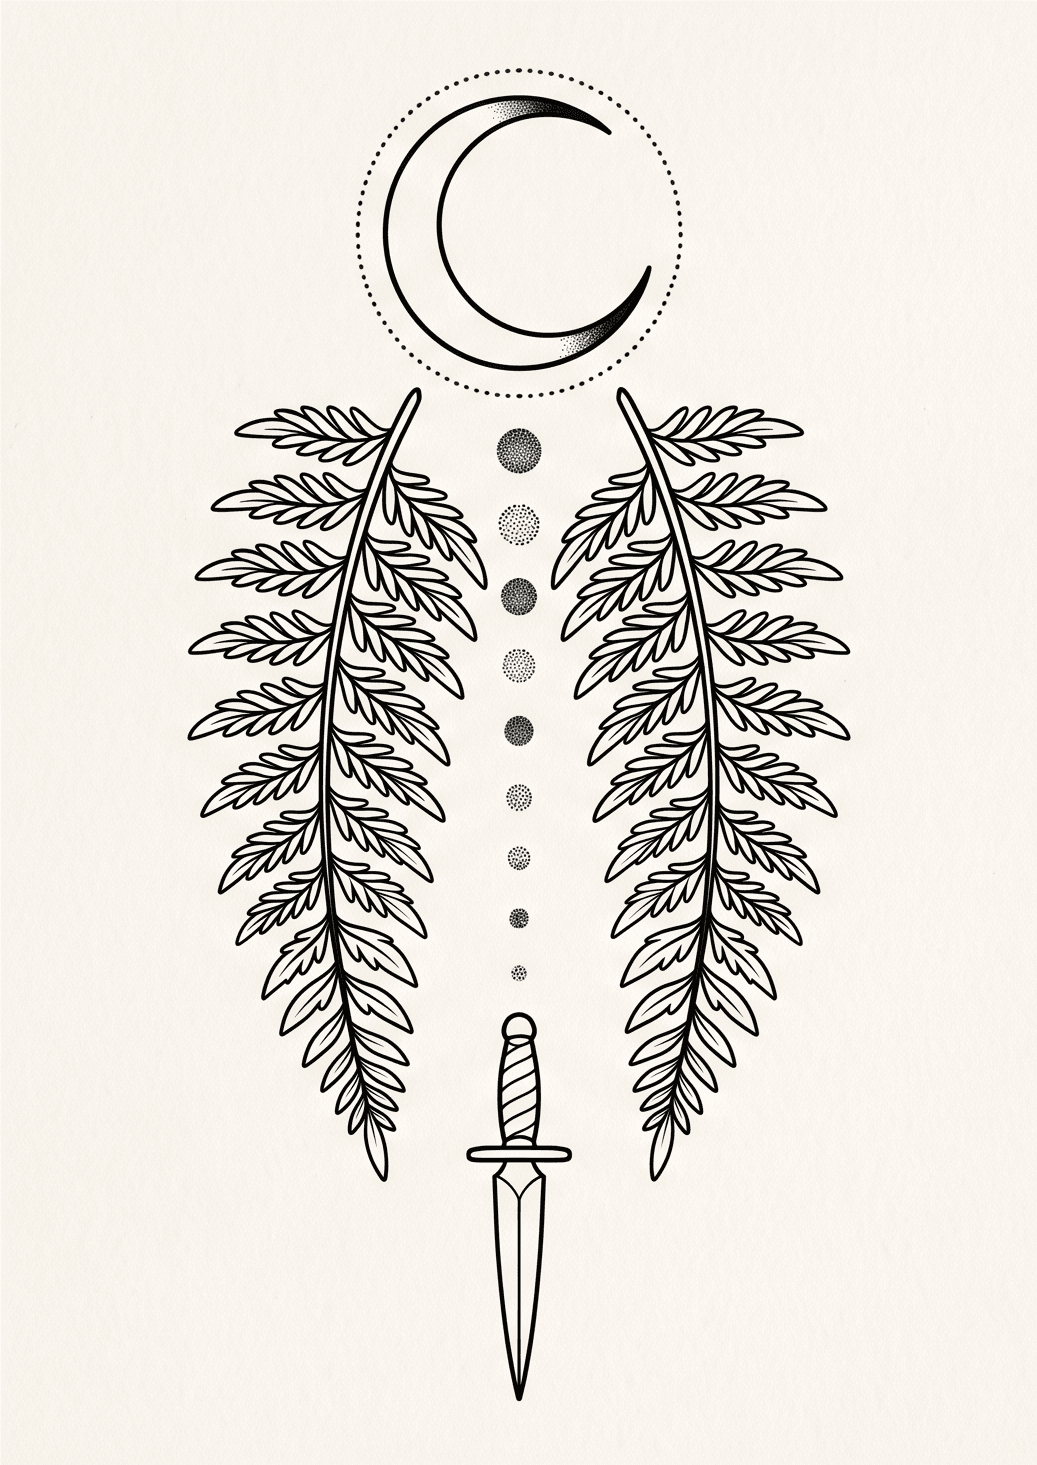
The finished 2K vertical flash sheet: crescent moon with dotwork halo at the top, two mirrored fern fronds down a central axis, seven tapering dotwork pairs, slim dagger at the base, all in flat black on off-white paper
The 2K flash sheet. Flat paper, closed lines, real gaps between elements. This is the file an artist can work from.
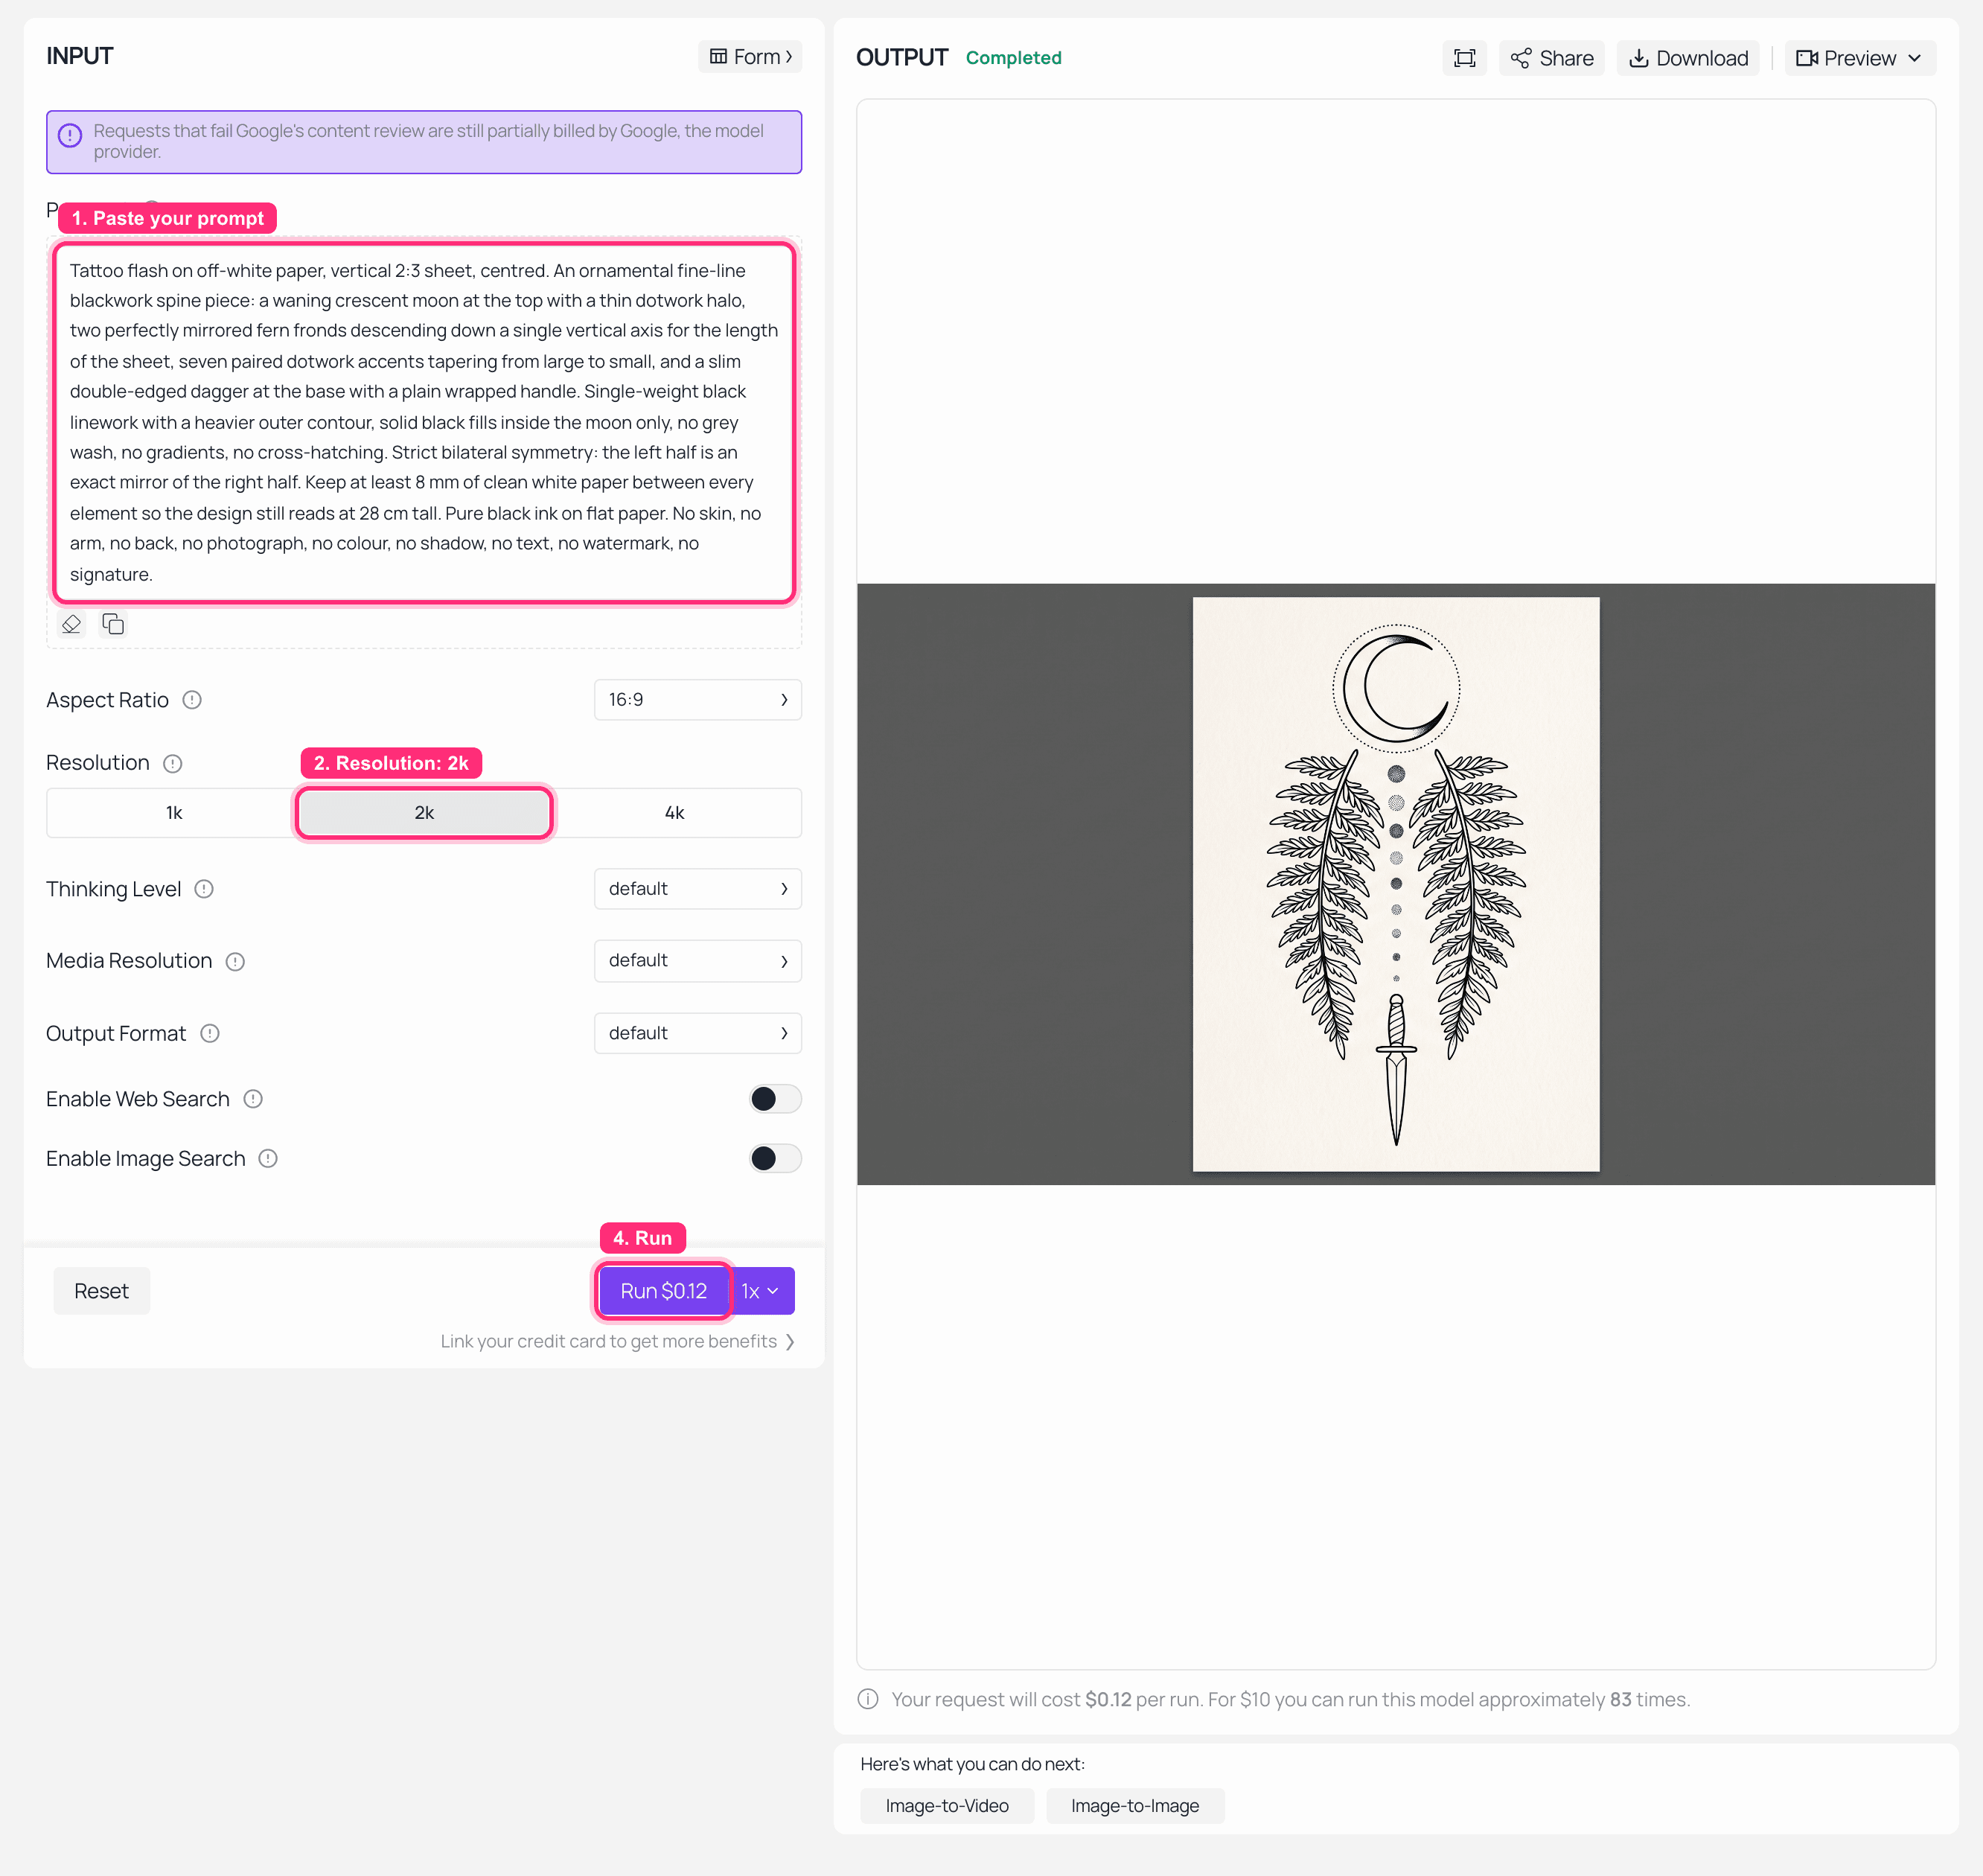
Nano Banana 2 text-to-image playground on Atlas Cloud with the flash prompt loaded, resolution set to 2K, the Run button quoting $0.12, and the finished vertical flash sheet in the output panel
Nano Banana 2 text-to-image on Atlas Cloud: 2K selected, $0.12 quoted, the finished sheet on the right. This run was left on the page's default 16:9 ratio, which is why the sheet arrives centred on a wide canvas. Set Aspect Ratio to 2:3 and the sheet fills the frame instead.
Step 3. Flatten it into a transfer-ready stencil.
A stencil is not a prettier version of the design. It is the design with every grey value removed, so a thermal printer can put it on transfer paper. This is an edit job, and the instruction has to be aggressive about changing nothing except the rendering.
Stay on the same platform and open Nano Banana 2 edit. Upload the Step 2 PNG. Settings: resolution 2K, and set the aspect ratio explicitly to 2:3 to match the input. If you leave the ratio empty, the model may recompose the sheet.
text1Convert the supplied tattoo design into a transfer-ready stencil. Keep the composition pixel-for-pixel: same crescent moon, same two mirrored fern fronds, same dotwork spacing, same dagger, same position and same proportions. Change only the rendering: every line becomes a closed, even-weight pure black contour on a pure white background, all grey values removed, all fills flattened to either solid black or empty white. Do not redraw, reinterpret, restyle or re-pose the subject. Do not add or remove any element. Output one single image, no side-by-side, no before-and-after panel. 2
One field note worth having before you pick a model for this: not every edit endpoint respects "keep the composition". Handed this exact class of instruction, some edit models quietly redraw the subject from scratch, and you get a different fern, facing a different way, wrapped a different way. For any job phrased as "keep everything, change one attribute", Nano Banana 2's edit endpoint is the one that behaved. The same logic applies if you are building your first stencil from an existing drawing rather than a prompt, which is the route covered in our tattoo AI design walkthrough.
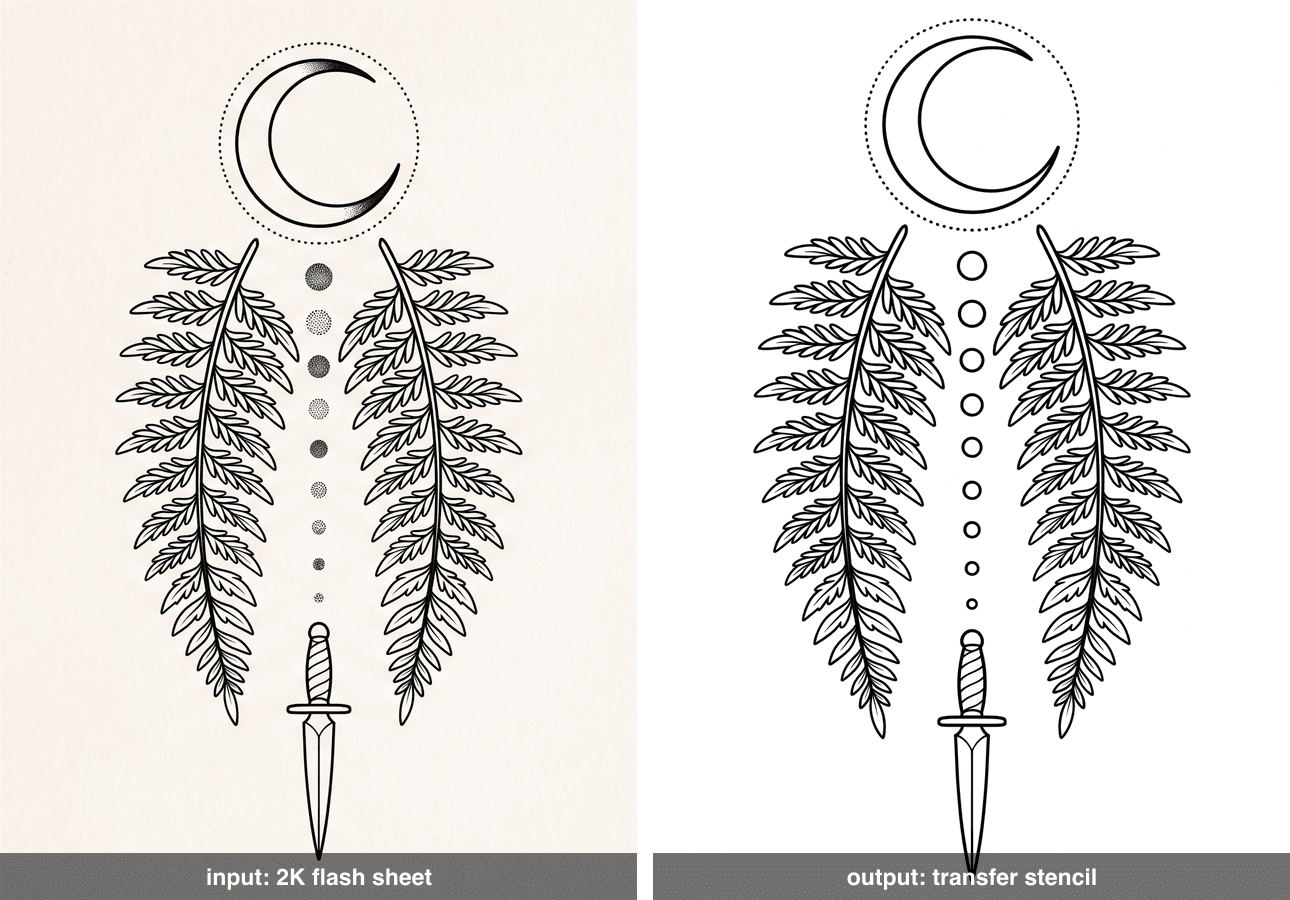
Left, the greyscale flash sheet going in; right, the stencil coming out, every line a closed even-weight pure black contour on pure white, composition unchanged
In and out. The composition is identical; only the rendering changed. That is the whole test for this step.
Step 4. Put it on your own back.
This is the step almost nobody does, and it is the one that answers the question you actually have: does this look right on me, at this size, in this spot?
Same Nano Banana 2 edit endpoint, but now with two reference images: a photo of your own bare upper back, and the Step 2 flash sheet. Shoot the photo in natural light, standing straight, relaxed, no filter, no beauty mode. Settings: resolution 2K, aspect ratio following the photo.
Notice the prompt never says "Image 1" or "Image 2". Upload slot numbers get assigned in the order the files finish processing, which you do not control, so describe the images by what they are instead.
text1Take the photograph of the person's bare upper back and the flat black tattoo design sheet. Apply the tattoo design onto the skin of the back, centred on the spine, running from the base of the neck down to just above the waist, about 28 cm tall. The ink must follow the real curvature of the spine and the shoulder blades, compress slightly where the muscle rounds away from the camera, and sit under the existing lighting of the photograph. Match the photograph's exposure, white balance, skin texture, pores and grain exactly. The ink reads as healed black tattoo ink absorbed into skin, slightly softened at the edges, not a flat sticker, not a decal, not a glossy overlay. Change nothing else: same pose, same background, same lighting, same crop, same skin tone. Output one single photorealistic image. 2
What you are inspecting: does the design narrow where the back narrows? Does the dagger land above the waistband or disappear into it? Is 28 cm actually the size you pictured, or does it look half a hand shorter than you imagined? This is where most people revise their size, and revising it here is free.
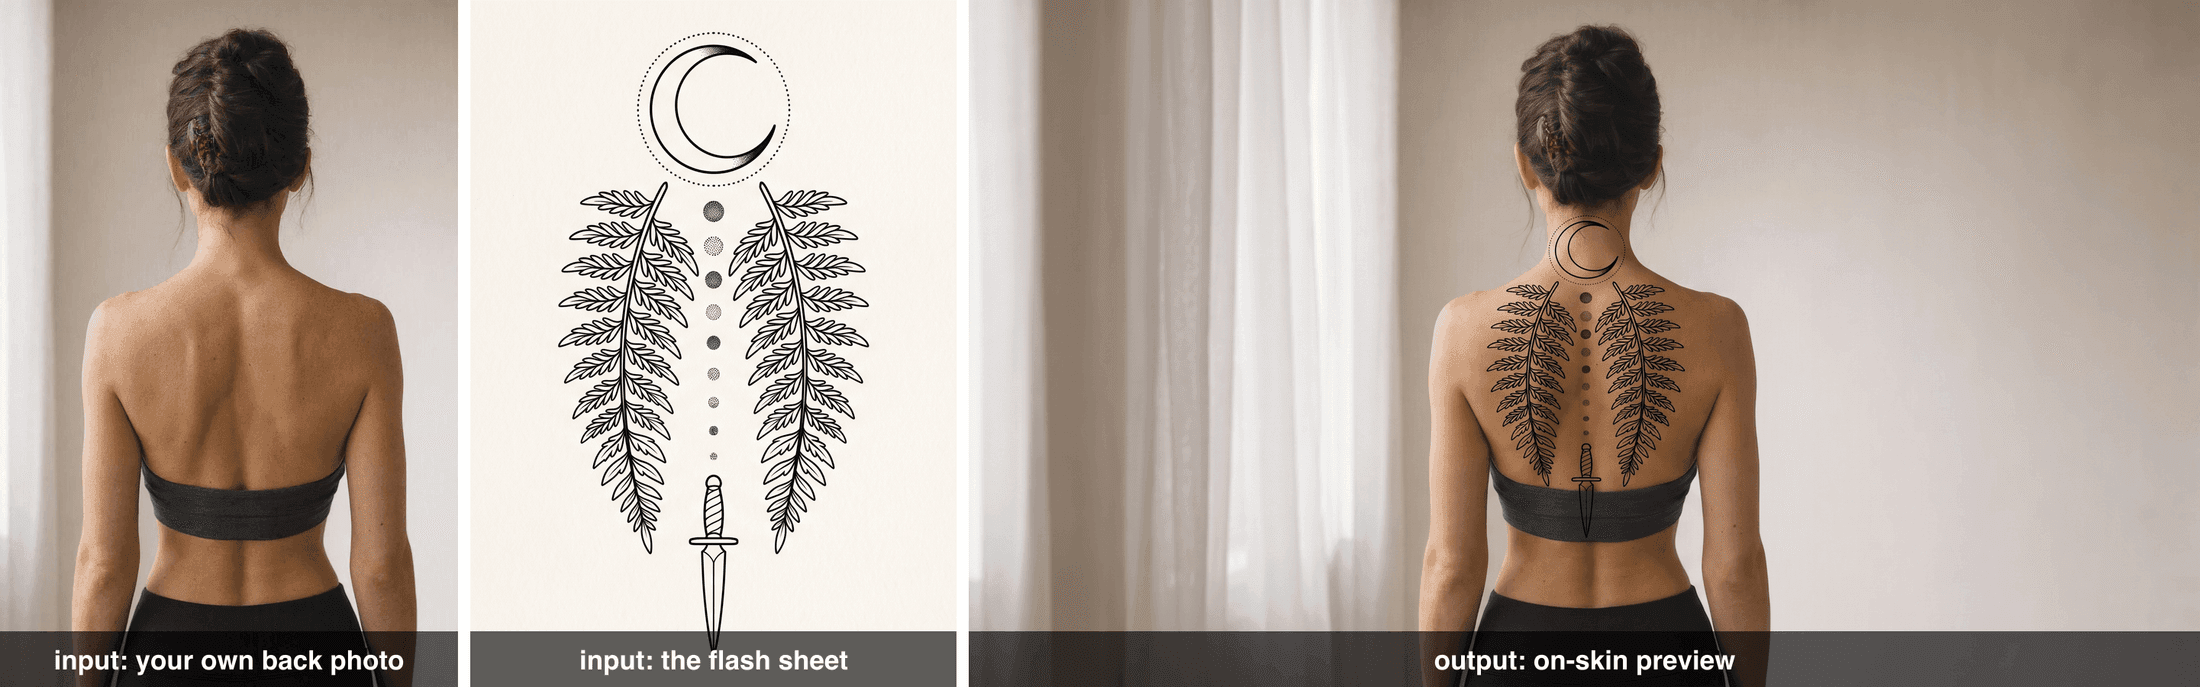
Left, two input thumbnails: a bare upper back photo and the flat flash sheet; right, the result with the design sitting along the spine, following the curve of the back and the shoulder blades under the photo's own lighting
Two references in, one preview out. The ink narrows and compresses where the back does.
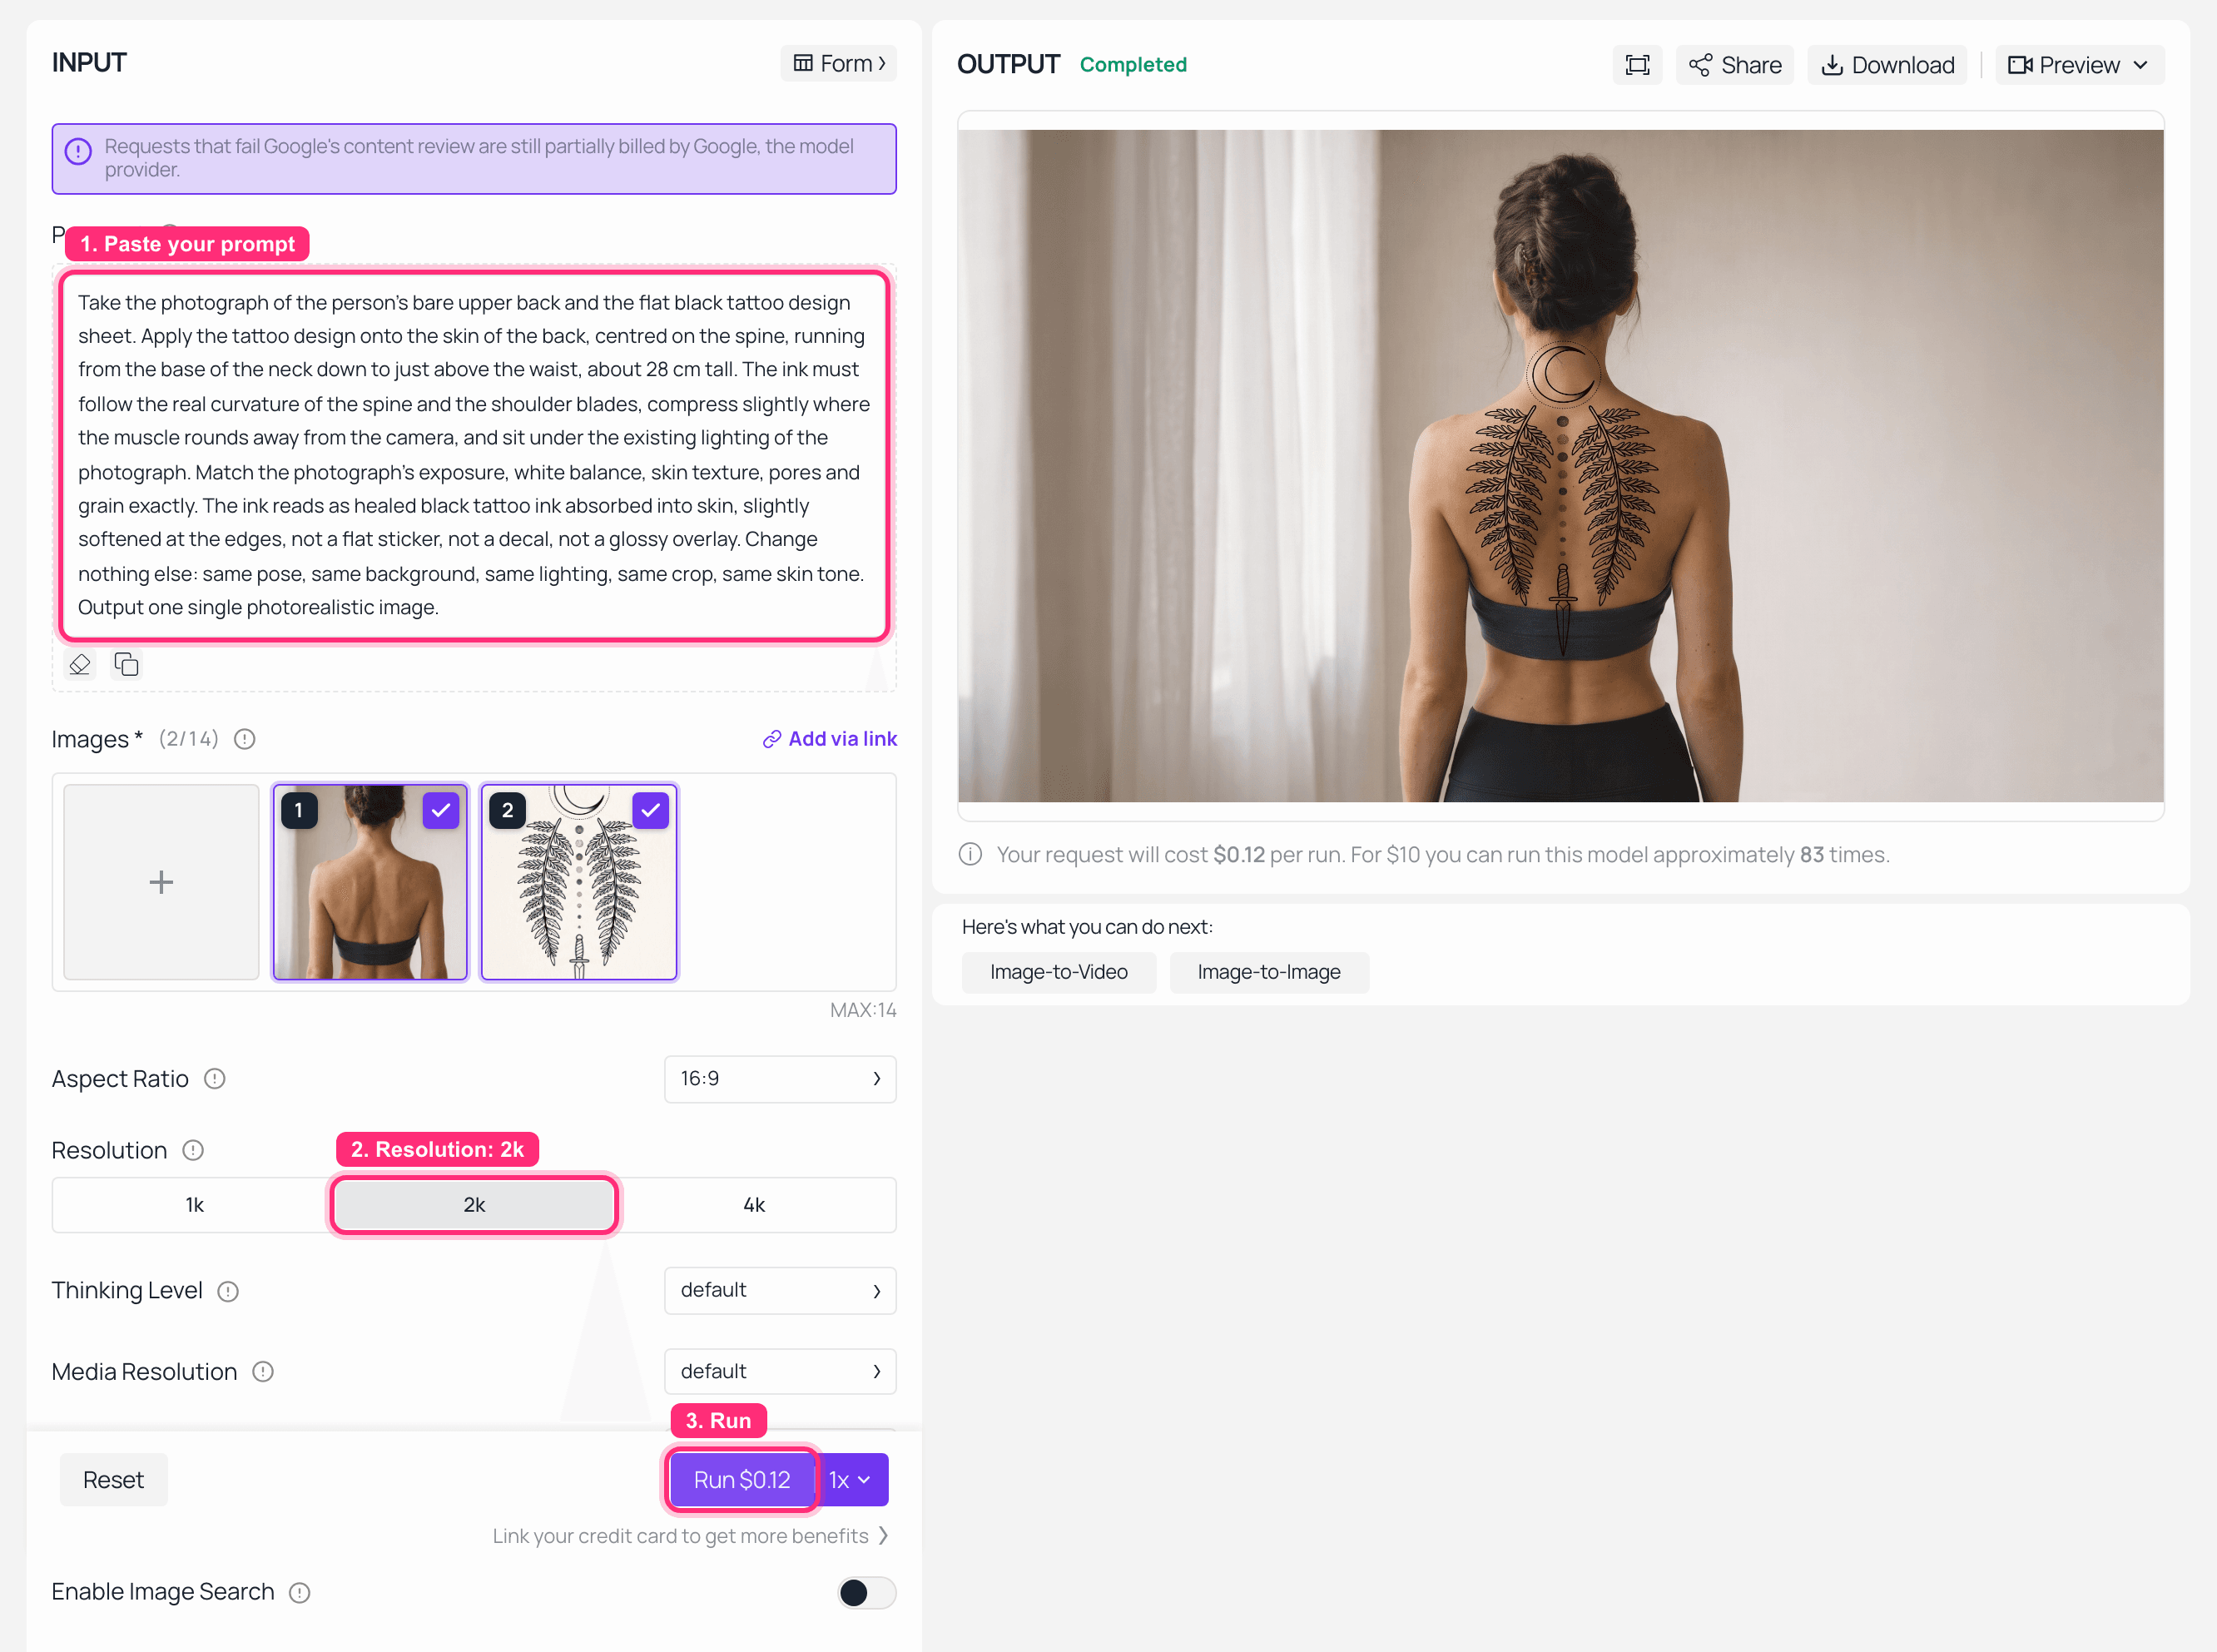
Nano Banana 2 edit playground on Atlas Cloud with both reference images loaded, the back photo and the flash sheet, resolution set to 2K, and the on-skin preview rendered in the output panel
Nano Banana 2 edit on Atlas Cloud: both references loaded, resolution 2K, the on-skin preview on the right.
Step 5. Make it move, because your back does.
A still preview cannot tell you whether the design distorts when your shoulder blades move. Five seconds of video can. Feed the Step 4 image into an image-to-video model and ask for exactly one thing: shoulders rolling, camera locked.
Open the Kling v3.0 Turbo image-to-video playground, upload the Step 4 output. Settings: duration 5s, resolution 720p. 720p is plenty; this clip exists to be watched once, not framed.
text1The person slowly rolls both shoulders back and lifts their arms slightly, then returns to a relaxed stand. The camera stays locked off. The skin stretches and the shoulder blades move under it, and the black spine tattoo stretches and compresses with the skin exactly as real ink would. Keep the same person, same skin tone, same lighting, same background, same tattoo design. No cuts, no zoom, no colour change, no new elements. 2
Be honest with yourself about what this clip is for. Video models repaint skin detail frame to frame, so the fine linework will wobble slightly in ways real ink would not. Treat the Step 4 still as the accurate render, and use the clip only to judge distortion: whether the mirrored ferns stay readable when the back flexes, and whether the dotwork column bends in a way you like.
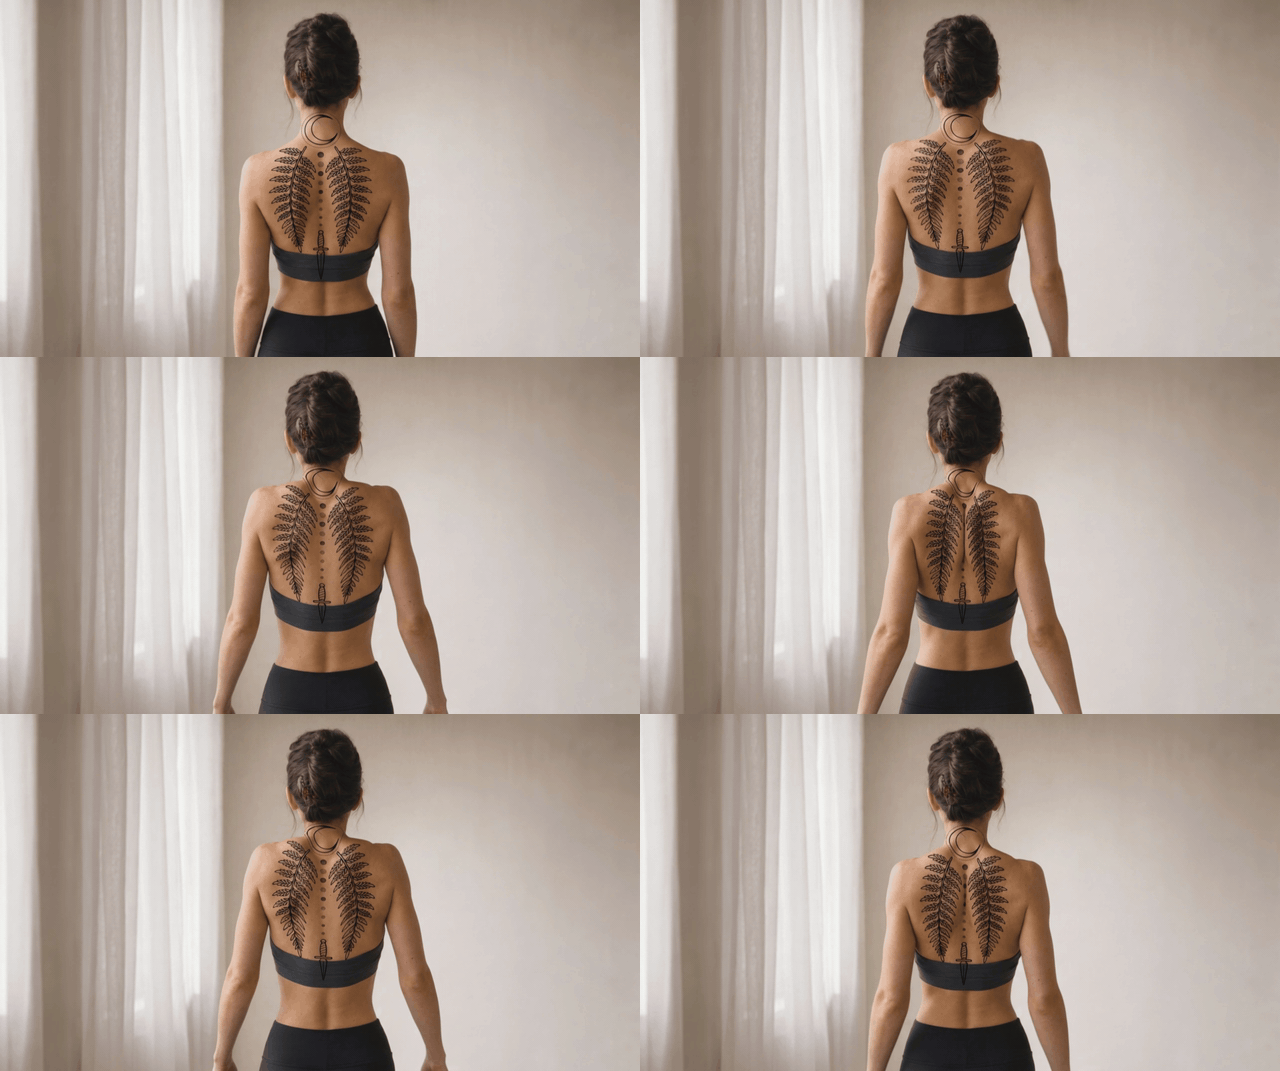
Five second clip: the person rolls their shoulders back and lifts their arms slightly while the camera stays locked, and the black spine design stretches and compresses with the skin
Shown as a silent GIF. Watch the dotwork column between the shoulder blades: that is where a spine piece distorts most.
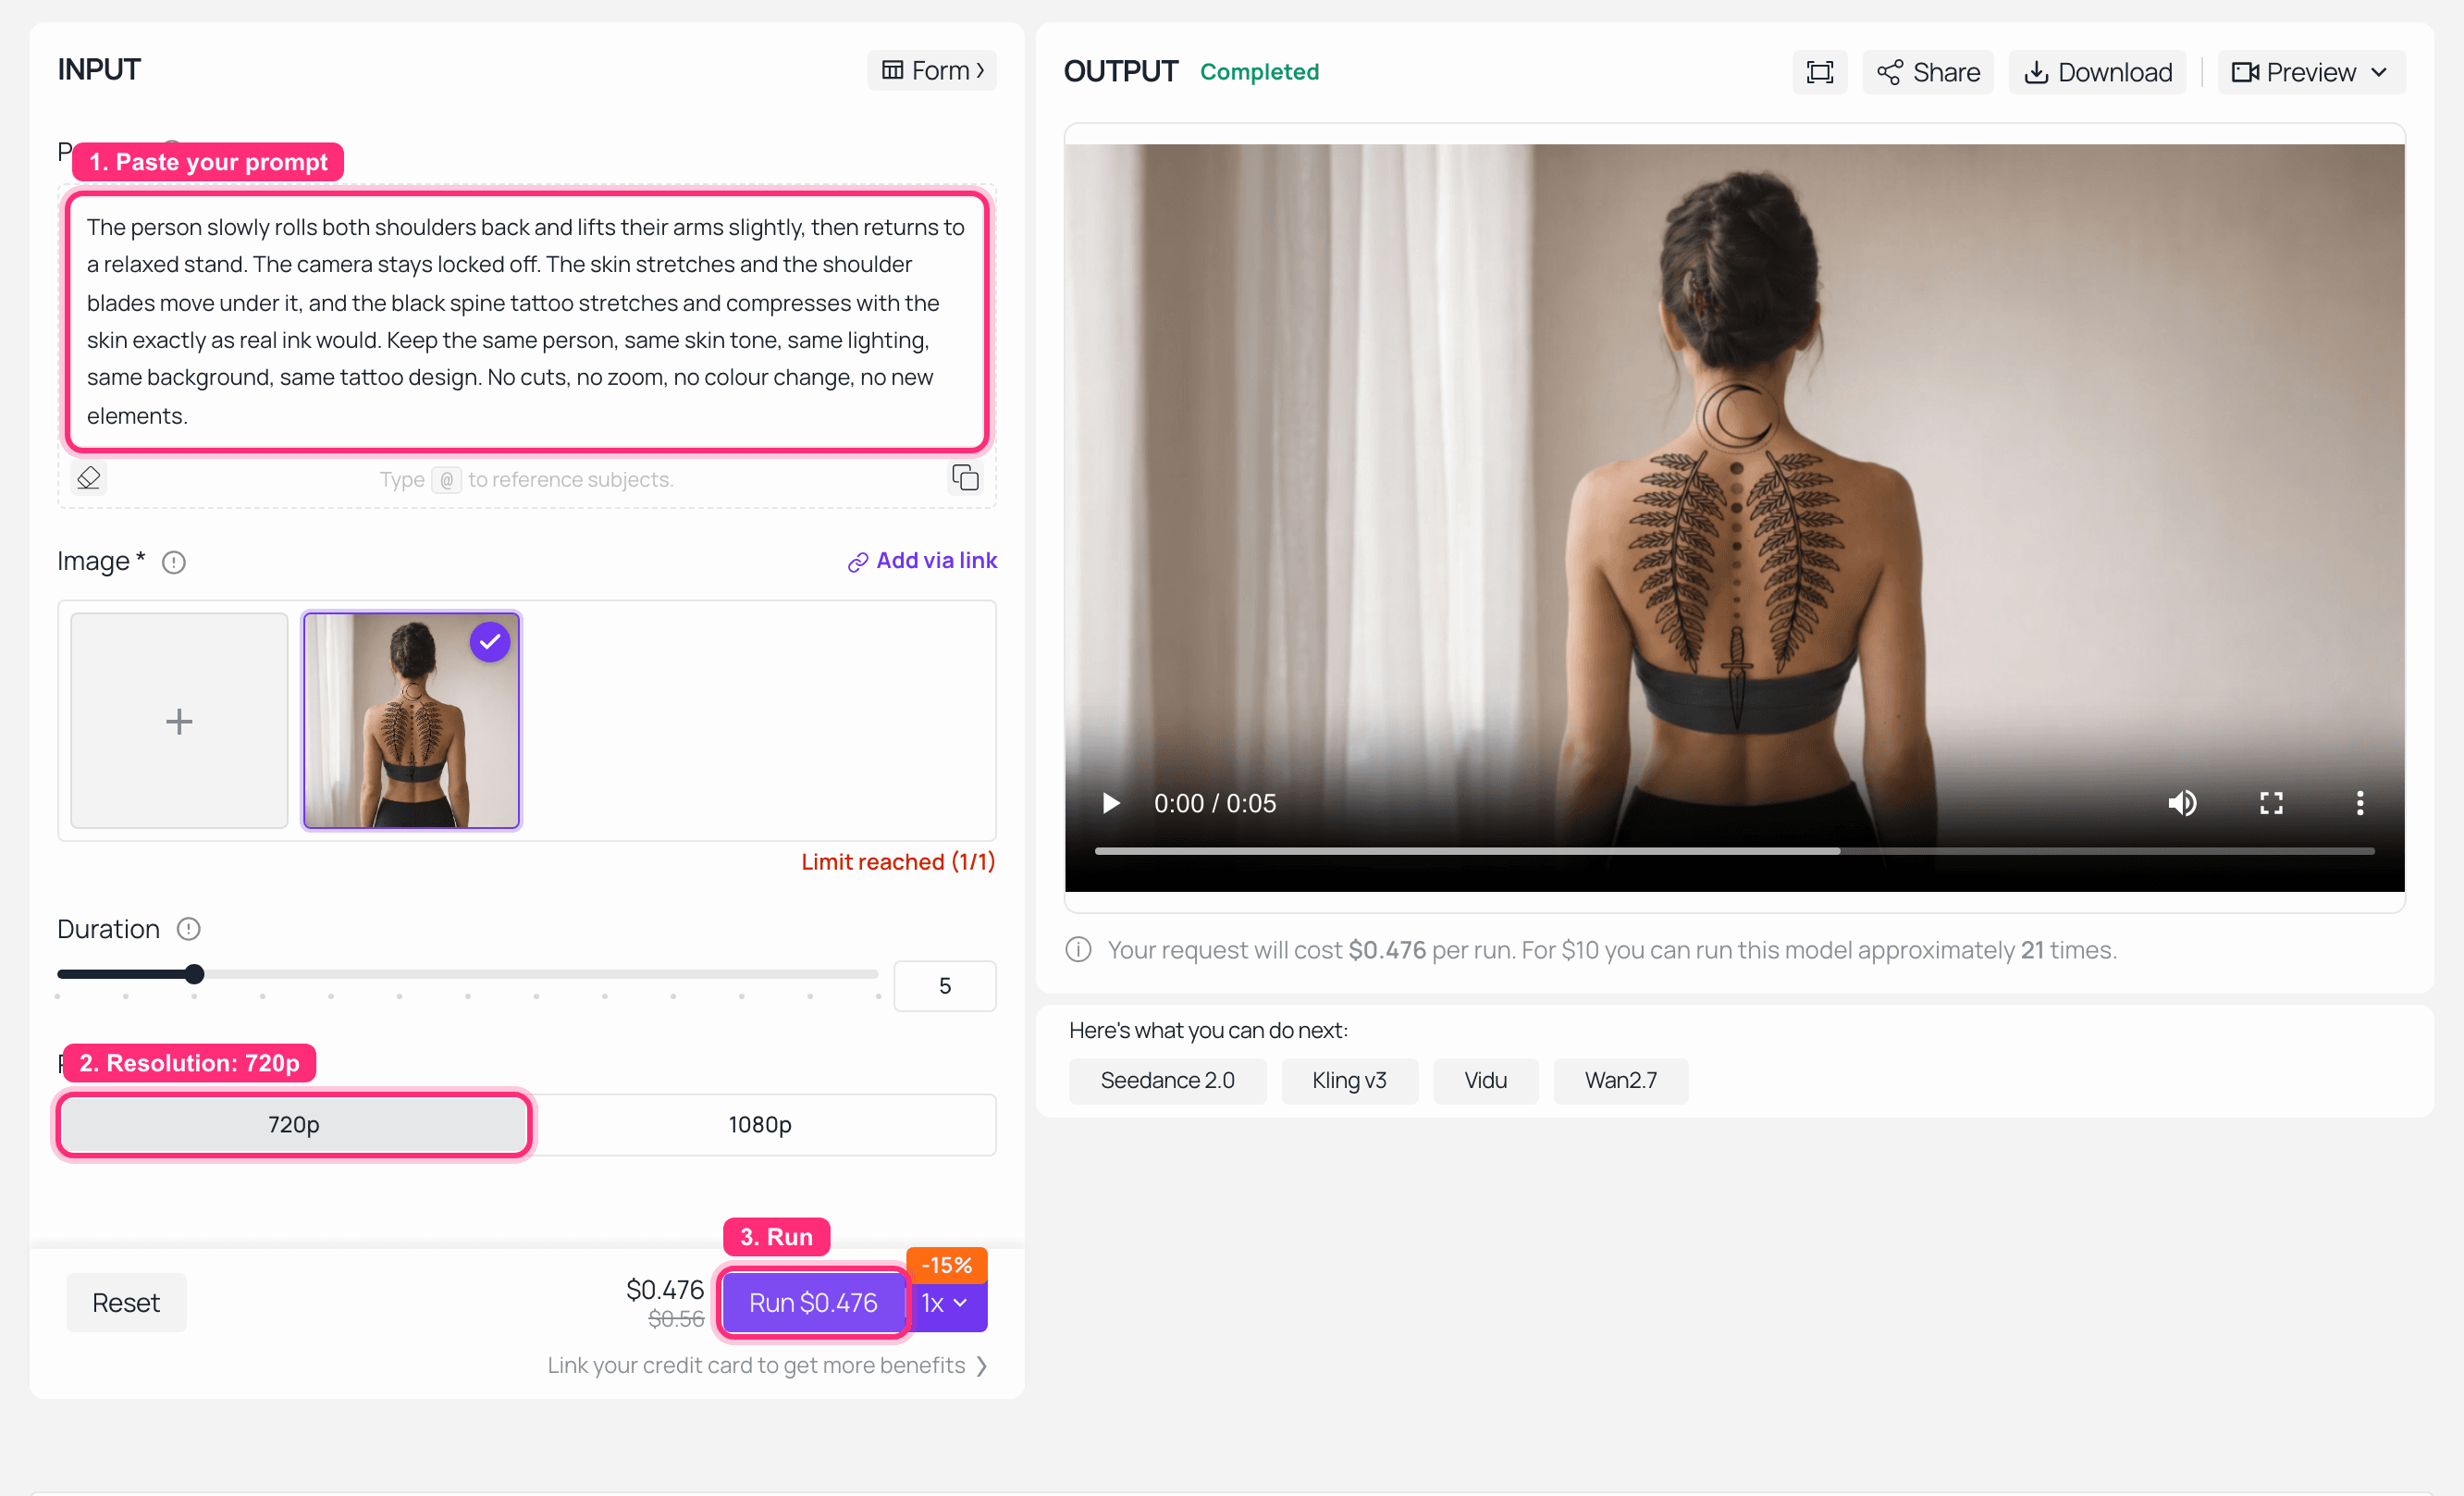
Kling v3.0 Turbo image-to-video playground on Atlas Cloud with the on-skin preview uploaded, duration 5s and resolution 720p selected, and the finished clip playing in the output panel
Kling v3.0 Turbo on Atlas Cloud: one image in, 5s at 720p, the finished clip in the output panel.
Tattoo AI Prompts: One AI Tattoo Prompt, Five Different Styles
Here is the payoff of writing a structured prompt instead of a sentence. Once the eight slots are filled, style is a single line you can swap. Everything else, the subject, the symmetry, the 8 mm gaps, the 28 cm scale, stays locked, so you are comparing styles rather than comparing five unrelated pictures.
Keep the Step 2 prompt exactly as it is and replace only the style and shading clauses:
Style: fine-line ornamental blackwork. Single-weight black linework, solid fills inside the moon only.Style: bold blackwork silhouette. Heavy solid black masses, negative-space linework carved out of the black.Style: neo-traditional colour. Bold black outline, flat muted colour blocks, no gradients, limited palette of sage green and dusty red.Style: micro-realism. Fine stipple shading in black and grey only, soft tonal transitions, no hard outline.Style: dotwork mandala. All tone built from stippled dots of varying density, no solid fills, no line shading.
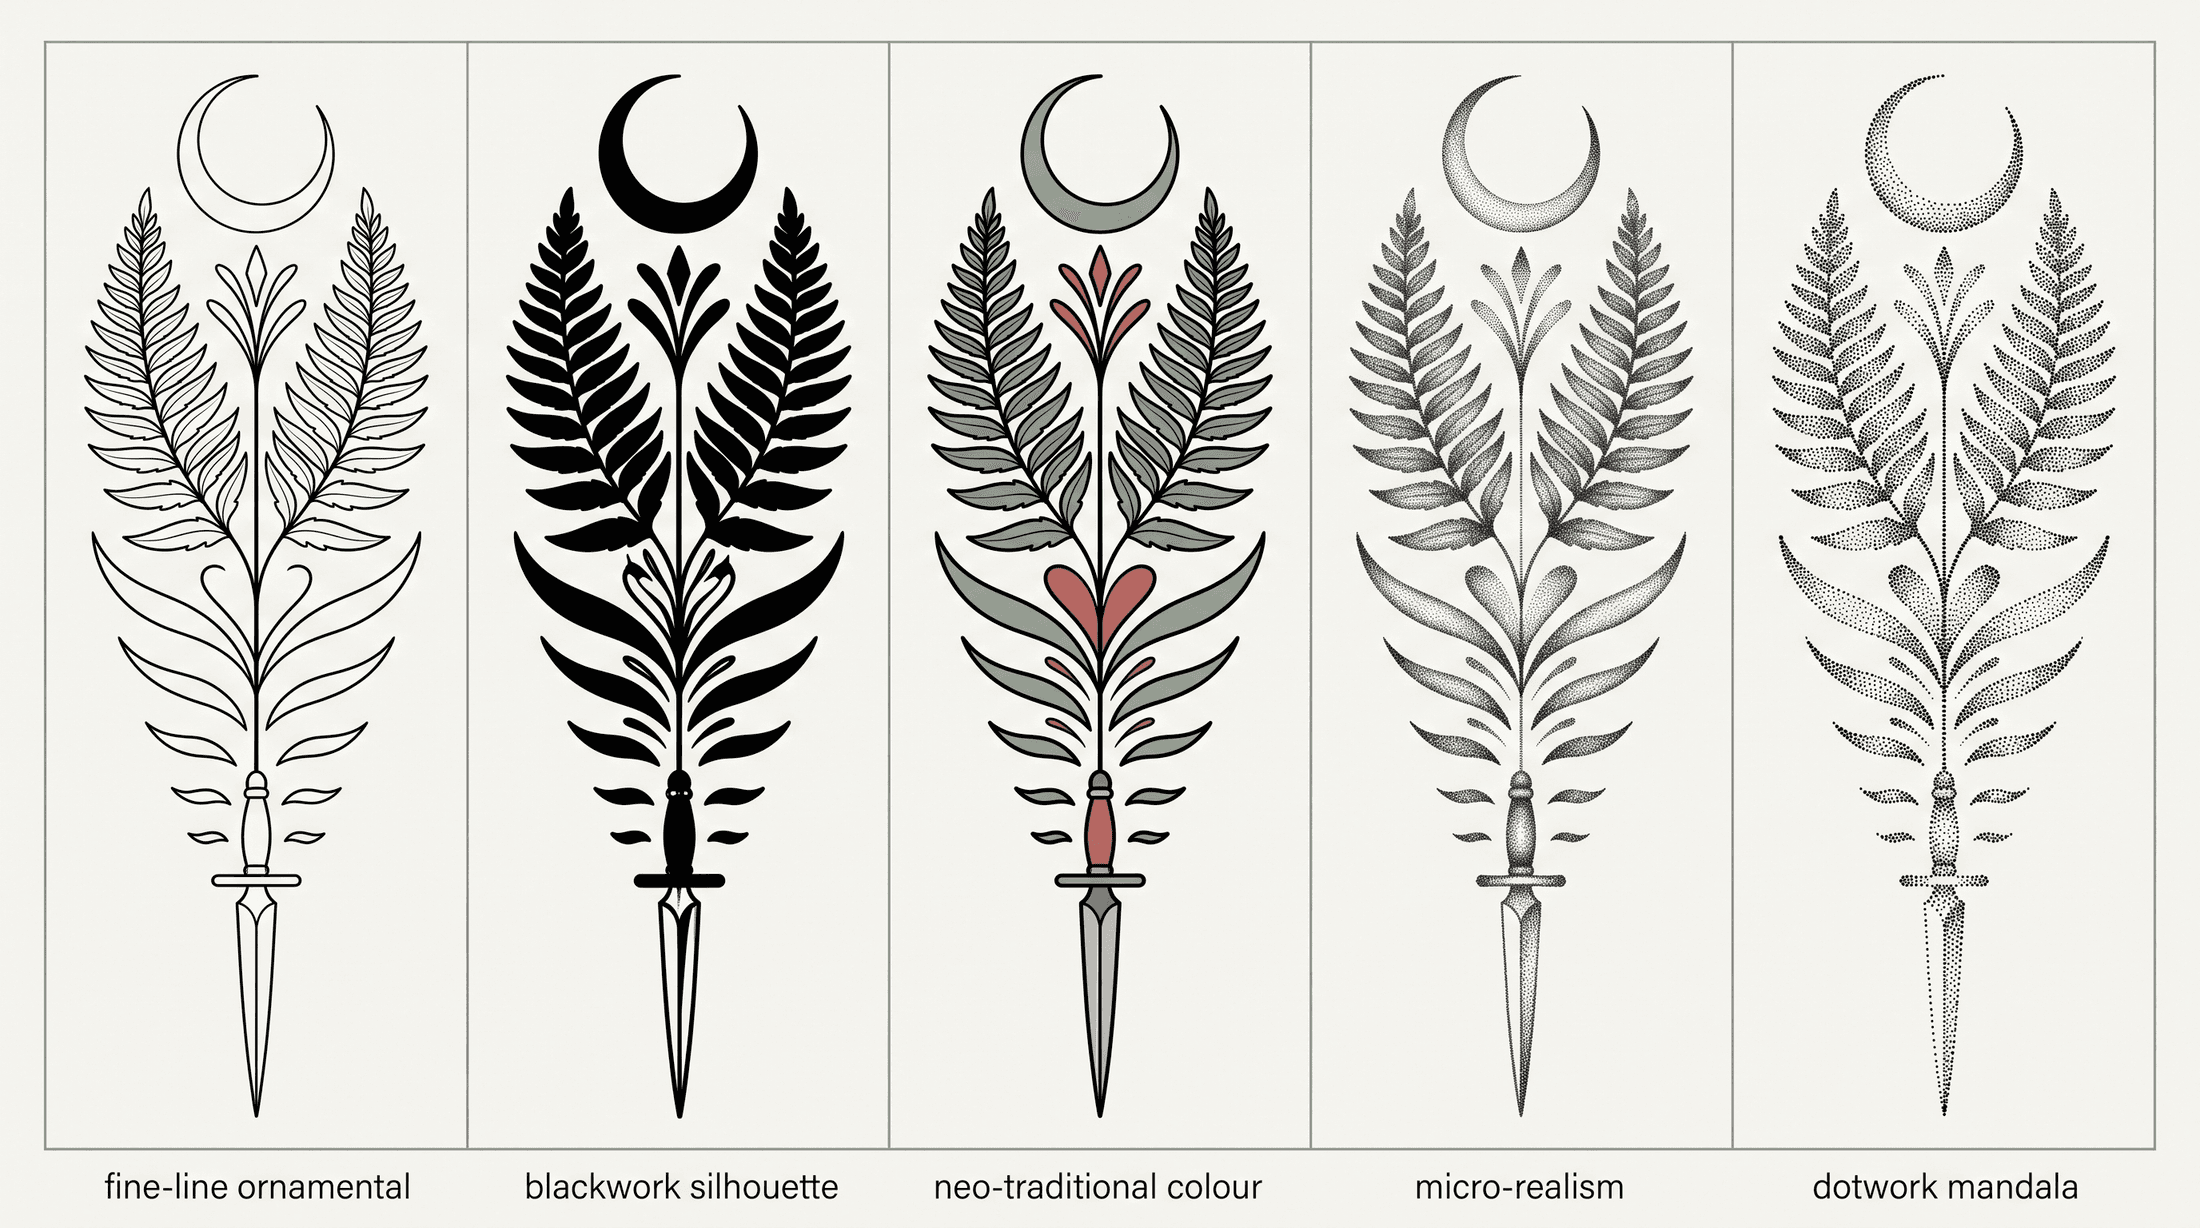
Five-panel grid, same crescent moon and fern spine composition rendered in fine-line ornamental blackwork, bold blackwork silhouette, neo-traditional colour, micro-realism, and dotwork mandala, each panel labelled with its style
One prompt skeleton, five style lines. The composition is identical in all five, which is the point.
Two of these deserve a warning. Micro-realism drops the hard outline, which is exactly the property that makes a design age well, so it is the riskiest of the five at small sizes. And dotwork mandala looks spectacular on screen while being the most labour-intensive to actually tattoo, so expect an artist to quote it very differently from the fine-line version.
Table C. Stop writing this, write that instead
| Common listicle wording | Write this instead | Why |
|---|---|---|
| tattoo, spine tattoo | tattoo flash sheet on off-white paper | "Tattoo" makes the model render inked skin. "Flash" makes it render a design. |
| hyper detailed, 8k, intricate | bold outer contour, single-weight interior lines | Detail tokens produce density no needle can hold. Line-weight words produce buildable linework. |
| beautiful shading | solid black fill, no gradients | Gradients are the number one thing that turns into a grey smudge on healed skin. |
| on a girl's back, on a forearm | flat flash on off-white paper, no skin, no body | Naming a body part invites a photograph. Describe placement in the scale slot instead. |
| elegant, dreamy, ethereal | strict bilateral symmetry, elements evenly spaced | Mood adjectives are unfalsifiable. Geometry is checkable at a glance. |
| small tattoo, large piece | designed to read at 28 cm tall along the spine | A number in centimetres controls detail density. "Small" does not. |
| no mention of gaps | at least 8 mm of clean open paper between every element | Left alone, models fill white space. Healed ink needs that space. |
What One Full AI Tattoo Prompt Run Actually Costs
Real numbers for the run above, rerolls included, at the prices verified on 17 August 2026.
Table D. Cost of one complete chain
| Step | Model | Runs (incl. rerolls) | Unit price | Subtotal |
|---|---|---|---|---|
| Scout the composition | GPT Image 2 t2i | 6 | $0.16964 quoted | $1.02 |
| Render the flash at 2K | Nano Banana 2 t2i | 2 | $0.12 | $0.24 |
| Stencil conversion | Nano Banana 2 edit | 2 | $0.12 | $0.24 |
| On-skin preview | Nano Banana 2 edit | 2 | $0.12 | $0.24 |
| 5s motion test at 720p | Kling v3.0 Turbo i2v | 1 | $0.476 after the 15% discount | $0.48 |
| Total | 13 jobs | a little over two dollars |
Two honest observations about that total. Almost half of it is the scouting row, which is the cheap step on paper and the expensive one in practice: those six high quality runs cost more than the flash, the stencil and the on-skin preview put together. Drop to medium while you are only judging layout, since layout is all you are judging, and that row nearly disappears. And the video, the step that sounds extravagant, comes to $0.48. If you want to trim this bill, scout cheaper rather than skipping the one step that shows you how the design moves.
Where the free entry point fits: the free tattoo generator covers Step 2, the flash sheet, for your first design at no cost and with no card. Steps 3 to 5 are edit and video work, so they run through the model playgrounds and cost what the table says. If you would rather compare entry points before committing to any of this, we ran a wider pass in our roundup of AI tattoo generators.
Taking an AI Prompt for Tattoo Design Into a Real Studio
Three things to get straight before you email anyone a PNG.
You probably do not own it the way you think. The U.S. Copyright Office's position is that human authorship is a prerequisite for copyright, works generated entirely by AI are not registrable, and prompting alone, however detailed, does not create authorship (U.S. Copyright Office, January 2025). Separately, Atlas Cloud's free tattoo tool page states its results are cleared for commercial use, which is a licence to use the file, not a copyright registration. Both things are true at once, and for a tattoo it rarely matters. It matters if you were planning to sell the design as flash.
Bring a reference, not an order. The fastest way to lose an artist is to hand over a file and a size and a date. Hand over the flash sheet, say what pulled you to it, and let them redraw it for your body. They will change the fern spacing. That is them doing the job the generator could not: fitting it to your spine, your shoulder blade width, your ribcage.
Do not let the image freeze the size or the placement. Your prompt said 28 cm because 28 cm made the detail density work in the render. Whether 28 cm is right on your back is a question for someone standing behind you with a stencil and a mirror.
Frequently Asked Questions
What makes a good AI tattoo prompt different from a normal image prompt?
Four things, all of which a normal image prompt leaves out. Say flash sheet on paper instead of "tattoo". Name a line weight rather than a level of detail. Name a size in centimetres. And name a minimum gap between elements so the model stops filling white space. Get those four in and the rest of the prompt behaves.
Why does my AI tattoo prompt keep returning a photo of an arm instead of a design?
Because the word "tattoo" describes a finished tattoo, and that is what the model is giving you. Rewrite the opening as Tattoo flash sheet on off-white paper and add explicit exclusions at the end: no skin, no body, no photograph. That pair of changes alone fixes it most of the time, no model change needed.
Can I take a design from an AI tattoo prompt straight to a tattoo artist?
Take it as a reference, yes. As a finished order, no. Artists are already fielding a steady stream of AI images that ignore anatomy and placement, which is why the ones who talk about it publicly keep making the same point about designs having to follow the flow of the body. Expect yours to be redrawn, and treat that as the service you are paying for.
Is there a free way to run an AI prompt for tattoo design?
Yes, for the design step. Atlas Cloud's free AI tattoo generator returns your first design at no cost, no credit card, at high resolution and without a watermark. It is one free design rather than an unlimited free tool, so paste in a fully written 8-slot prompt instead of burning it on a one-liner. The stencil conversion, the on-skin preview and the motion test are paid jobs on the model playgrounds.
How do I preview an AI tattoo prompt result on my own skin?
Use an edit model with two reference images: an unfiltered photo of the body part, and your flash sheet. Ask for healed ink that follows the real curvature and sits under the photo's existing light, and explicitly forbid the sticker and decal look. Then, if you want to check distortion, feed that result to an image-to-video model for five seconds of movement.
Do tattoo ai prompts work for lettering and names?
Badly, and you should assume they will misspell things. Image models draw letter shapes rather than spelling words, so a name comes back with a doubled letter or an invented flourish more often than not. Handle lettering as its own separate job with its own verification pass; we broke down what actually works in our guide to generating tattoos from text.
The word was "flash". The other seven slots are just you writing down what an artist would have had to ask you anyway. Fill them in, run the chain once, and walk into the studio with a reference instead of an argument.
Start with the flash sheet on the free AI tattoo generator, then take it the rest of the way on Atlas Cloud.